CryptoNir Documentation
CryptoNir – Crypto Trading Stock Market Financial Premium Free News website
Cryptonir is a blog article website where admins can publish blog articles as they wish. Admin can keep a free blog and can keep a paid blog if they want. The website is designed to publish crypto news blogs and articles, and signal-related news. Admin can decorate their blog website with their topics and publish them. The website is completely dynamic, and the admin can change all the information on the website as per their wish and can create categories, update, and delete. While creating a blog, the admin will create a blog with the necessary information of the blog. If the admin wants, he can keep a free blog, and he can keep a paid blog.
Free Crypto Blog Article Writing : If the admin keeps a free blog, then the customer will be able to view the blog's details directly. The customer does not need to subscribe or login to an account; he can view the Blog Article directly.
Paid Crypto Blog Article Writing : If the admin keeps a paid blog, then the User must buy a subscription, and then the user sees the complete blog details.
CryptoNir is available with 2 features: a deposit balance user account and a direct payment user account. Deposit BalanceThe user can deposit the balance into their account. Users can purchase any plan of their choice with their account balance. Direct payment Users can purchase the Plan directly through online payments or manual payments. Users can get the signup bonus for registering on the website, and users can also earn a referral bonus. It is an SEO-friendly, architectural, and secure website. It has a very eye-catching dynamic theme for the frontend, user dashboard, and admin dashboard. If you are looking for a Crypto Blog website that will take your business to the next level, then CryptoNir will be the right choice for you. You can enjoy lots of features, along with payment gateways and publish a free blog or a paid blog. We can say that this is the CryptoNir for which you are looking to start your Blog Website. All the websites and features are managed by the admin.
FAQ
Frequently Asked Questions About the Server
Question 1: Do I need a VPS OR a Dedicated server to run this platform ?
Answer:
No, this platform will function properly even if you run it on a shared host. However, you might need to update your server or hosting if you receive a lot of traffic. To guarantee optimal performance, our programs are extensively optimized.
Question 2: Which hosting provider should I choose for this? Do you have any
suggestions ?
Answer: Any hosting company that offers cPanel-based hosting is an option for you. Although it is not required, we advise you to choose hosting that is based on cPanel.
Question 3: I don't have cPanel, What should I do?
Answer: Don't worry; our system may be used with any control panel. However, because cPanel is simple to use, we suggest hosting that is based on it. Additionally, our free support is only available for hosting that uses cPanel.
Question 4: If I failed to install Do you support installing?
Answer:
Yes, no worries. We'll help you finish the installation.
Built With CryptoNir
Created with the future in mind
- using Bootstrap, Laravel, and jQuery—the greatest, most secure, user-friendly, and future-proof stack available.
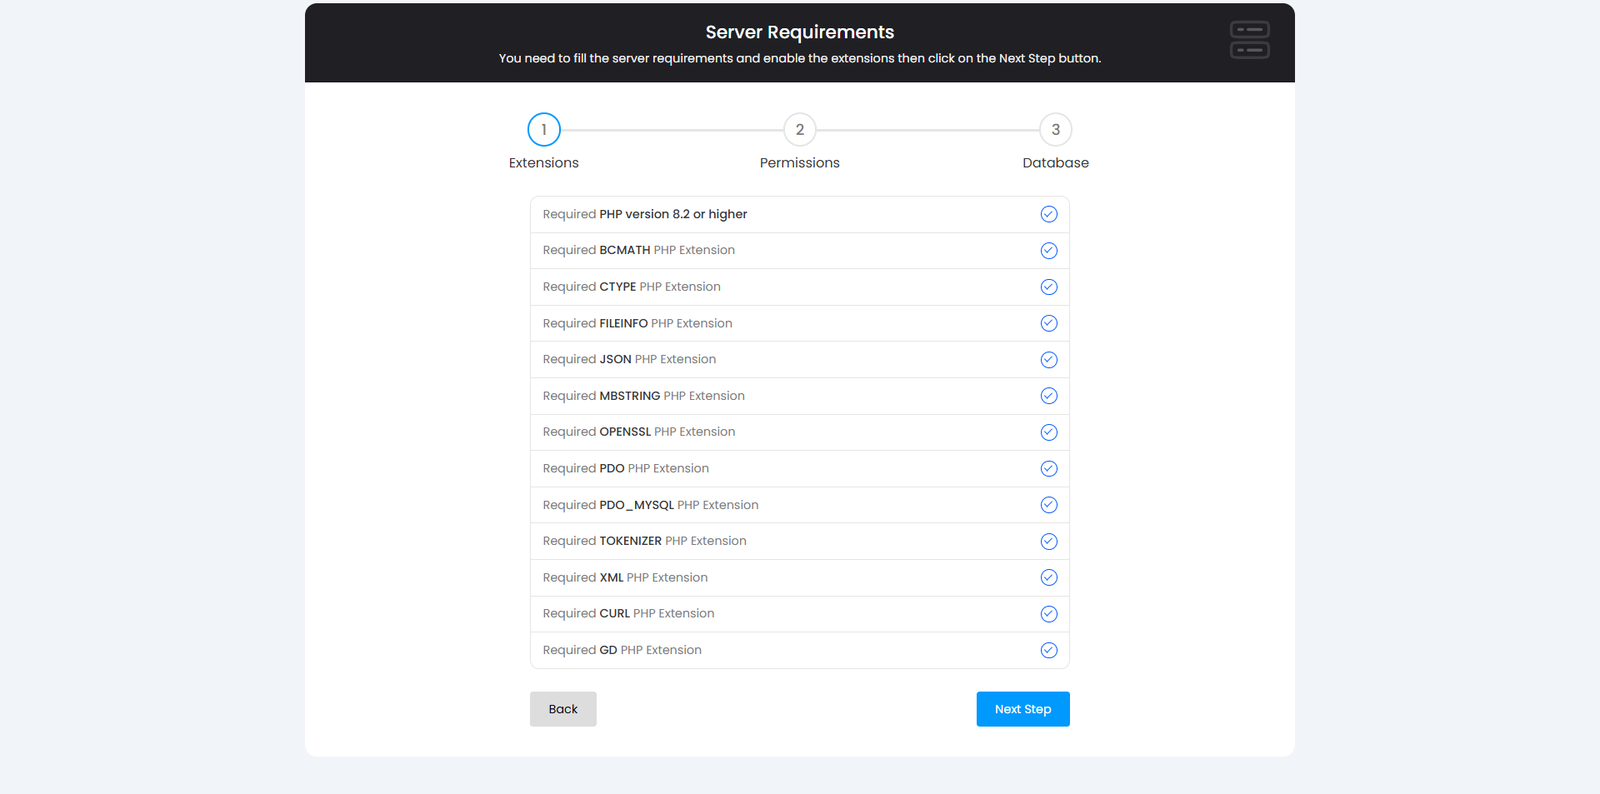
Server Requirements
Requirements
- ✓
PHP versionMinimum PHP Version 8.2 - ✓
MySQLVersion 5.7+ or MariaDB version 10.2+ - ✓
BCMATHPHP Extension - ✓
CTYPEPHP Extension - ✓
FILEINFOPHP Extension - ✓
JSONPHP Extension - ✓
MBSTRINGPHP Extension - ✓
OPENSSLPHP Extension - ✓
PDOPHP Extension - ✓
PDO_MYSQLPHP Extension - ✓
TOKENIZERPHP Extension - ✓
XMLPHP Extension - ✓
CURLPHP Extension - ✓
GDPHP Extension
Installation Process
Please read through the whole installation section carefully. You can install this web application with a few easy steps.
All steps are demonstrated part by part below.
cPanel File uplode all steps
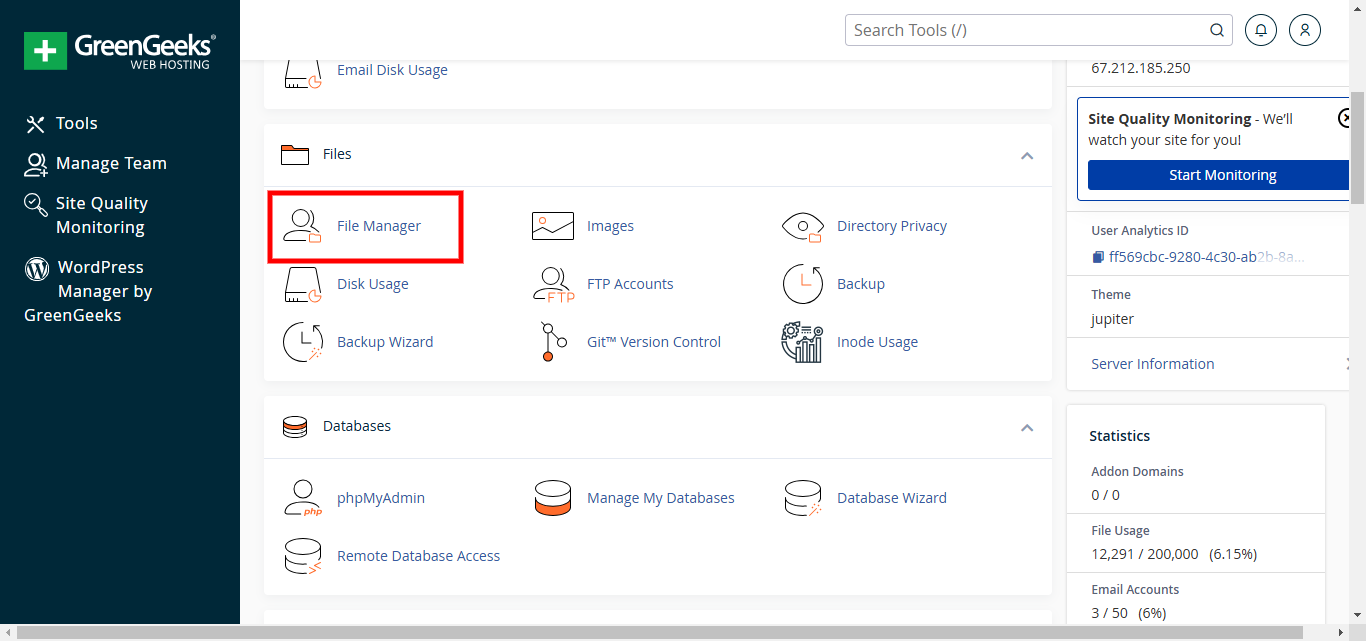
Access your Cpanel account and login in with your credentials. Then go to File Manager.
Go to public_html folder.
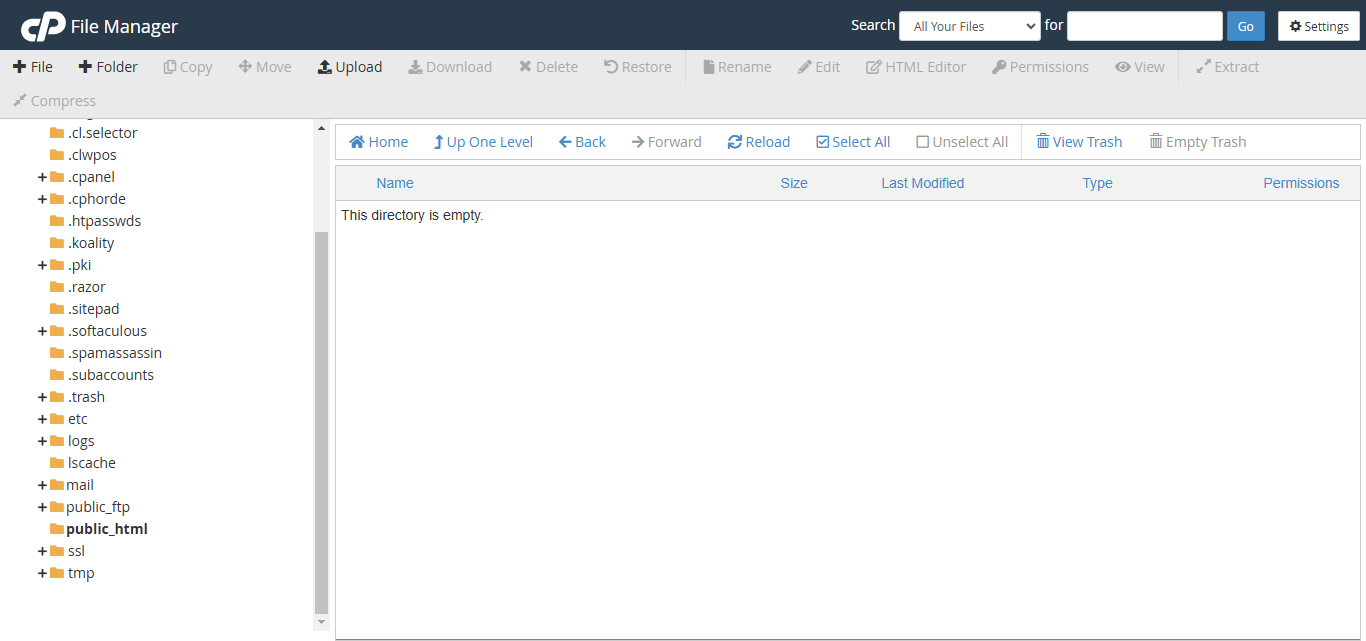
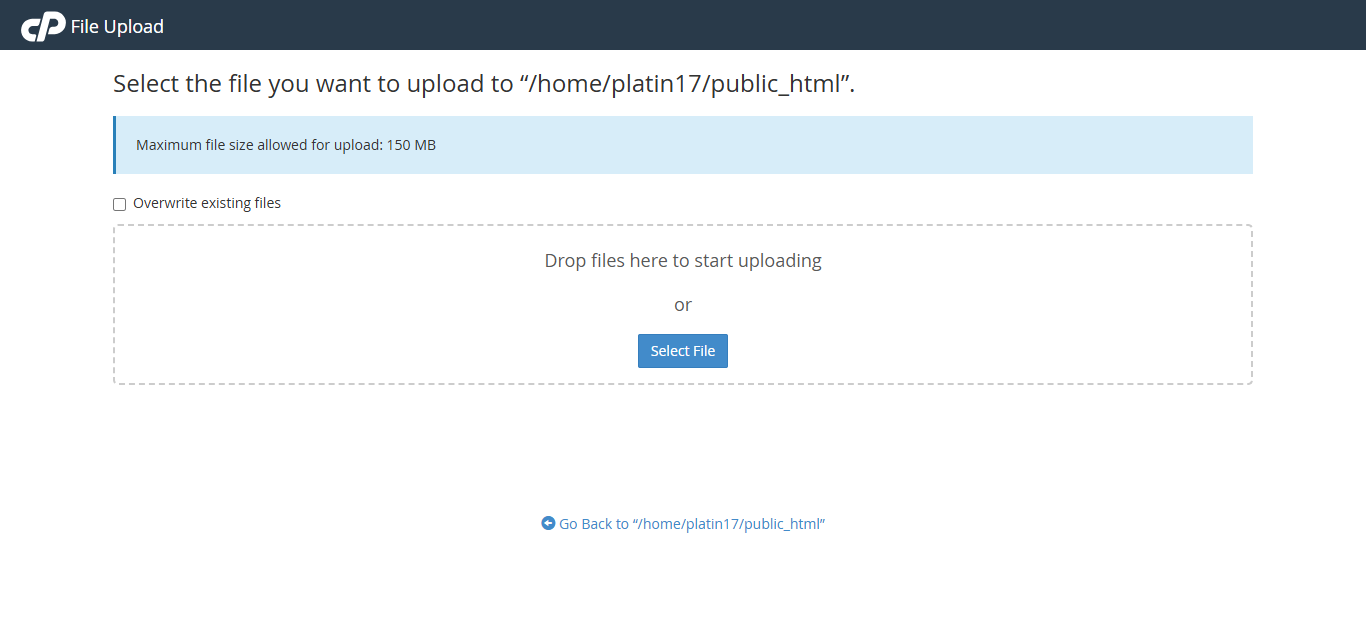
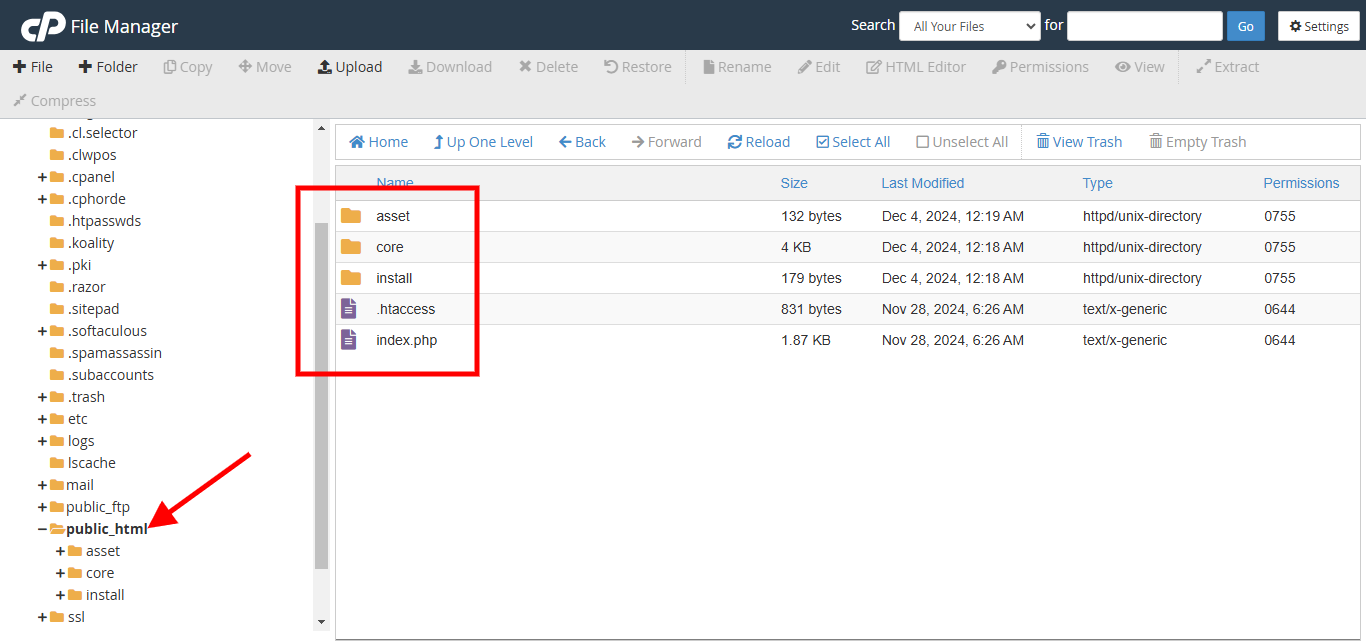
Click on the Upload button. Then go to File upload option . You can see in this type screen and upload your file
CPanel Create a Fresh New Database and username password
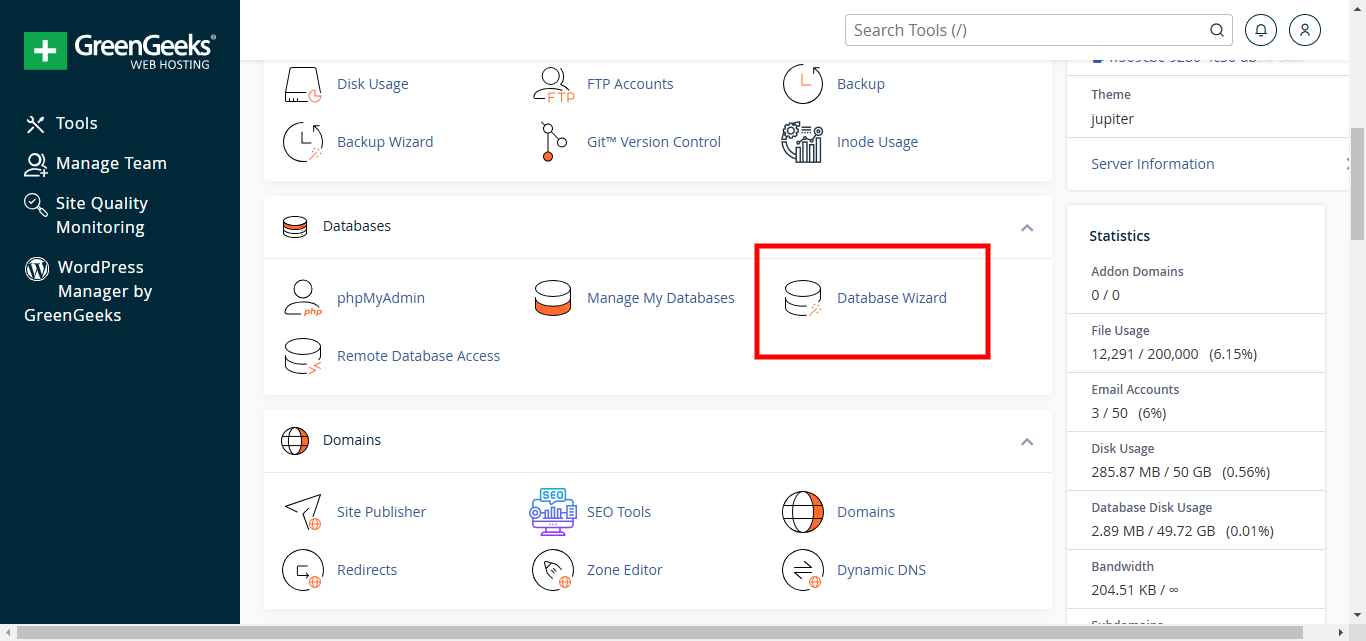
You can easily create a database and user using the Database Wizard. Just follow my steps.
Create the database using Database Wizard, click on the Database Wizard.
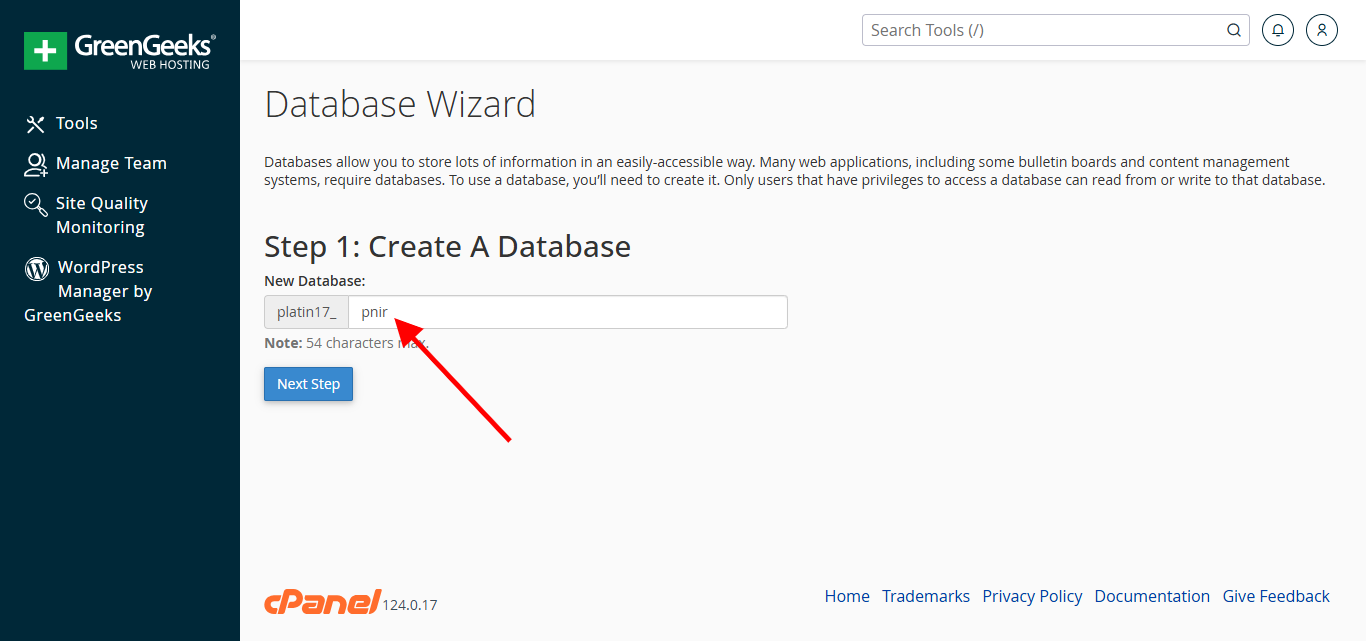
Fill the database name and click on the Next Step button.
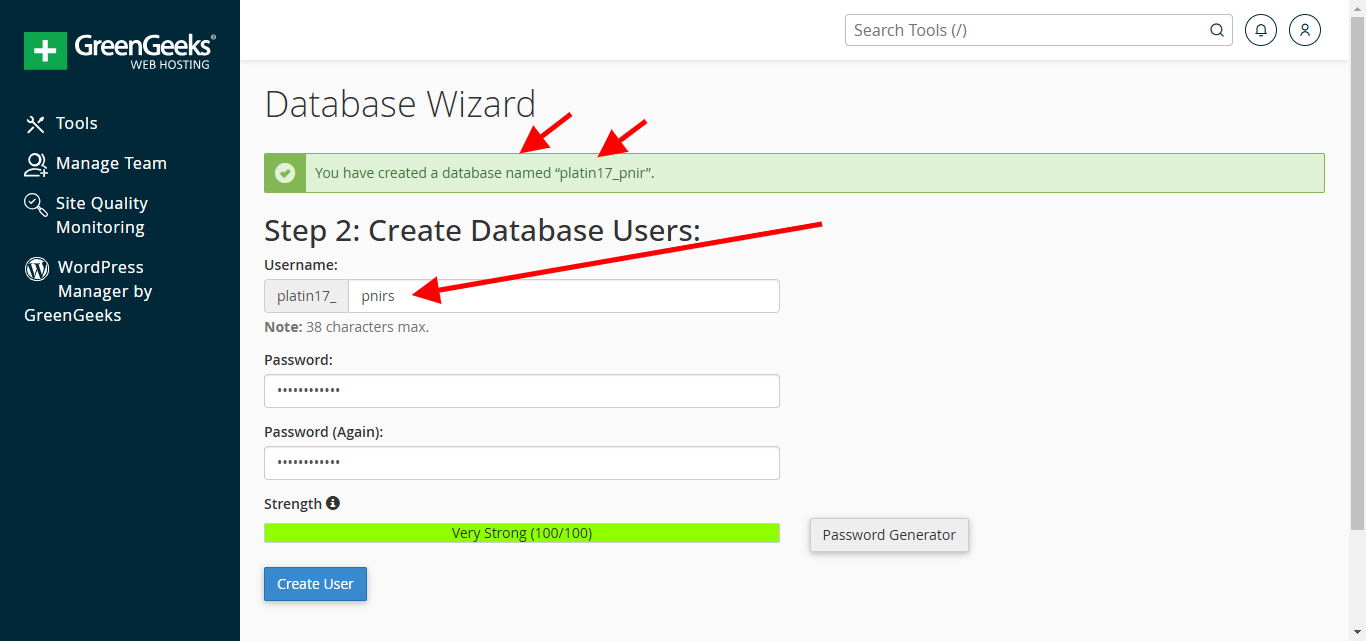
Fill the username and passoword then click on the Create User button.
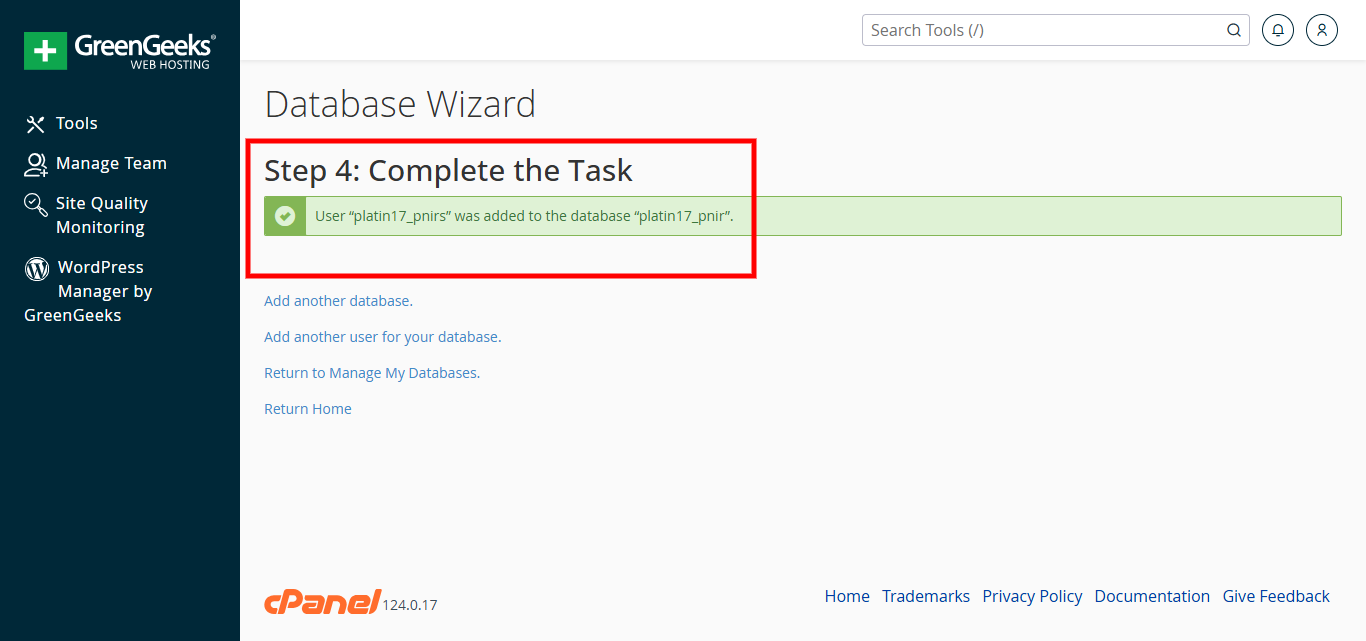
Checked ALL PRIVILEGES and then click on the Next Step button.
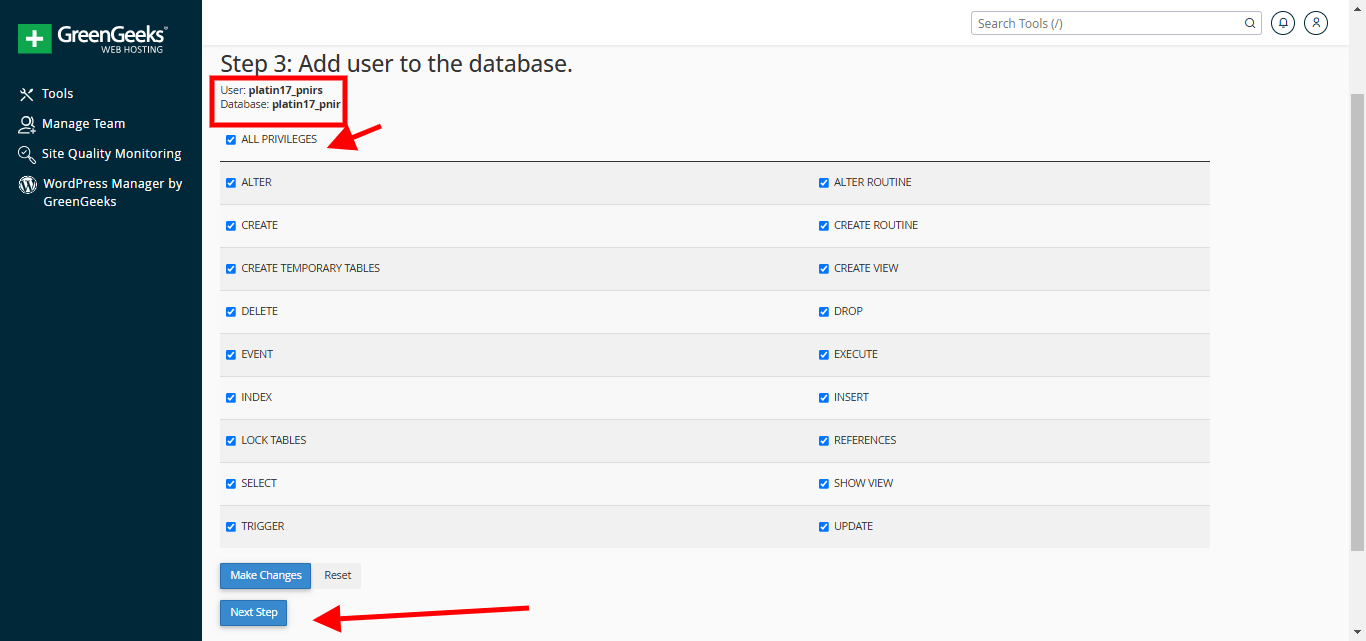
Congratulations! You have successfully configured the database. Please remember the database credentials, as they will be needed when you install the CryptoNir script.
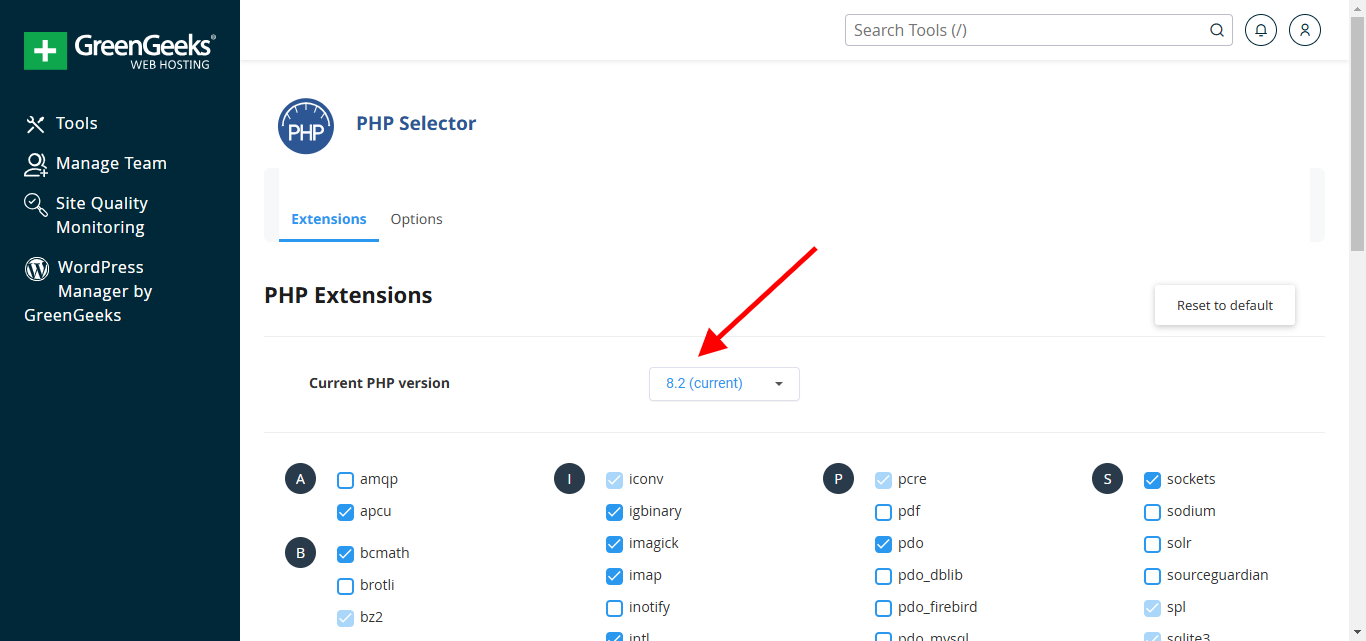
Search by typing your server PHP version in the search option and select PHP version 8.2.
You can install CryptoNir yourself simply in 5 steps without any coding knowledge
Please Reload your domain URL and then you will see this screen
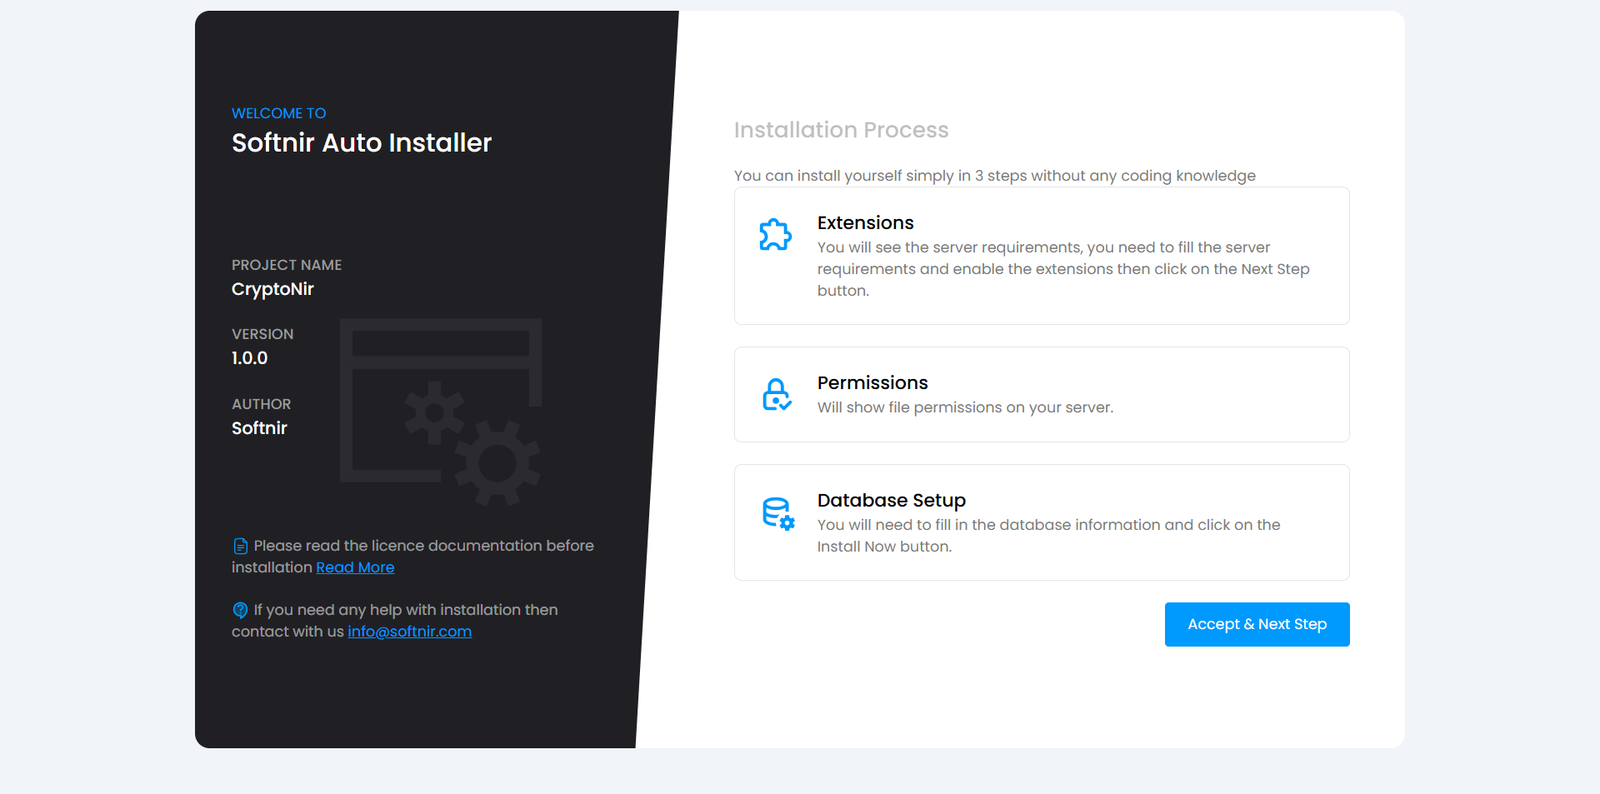
You need to fill the server requirements and enable the extensions then click on the Next Step button.
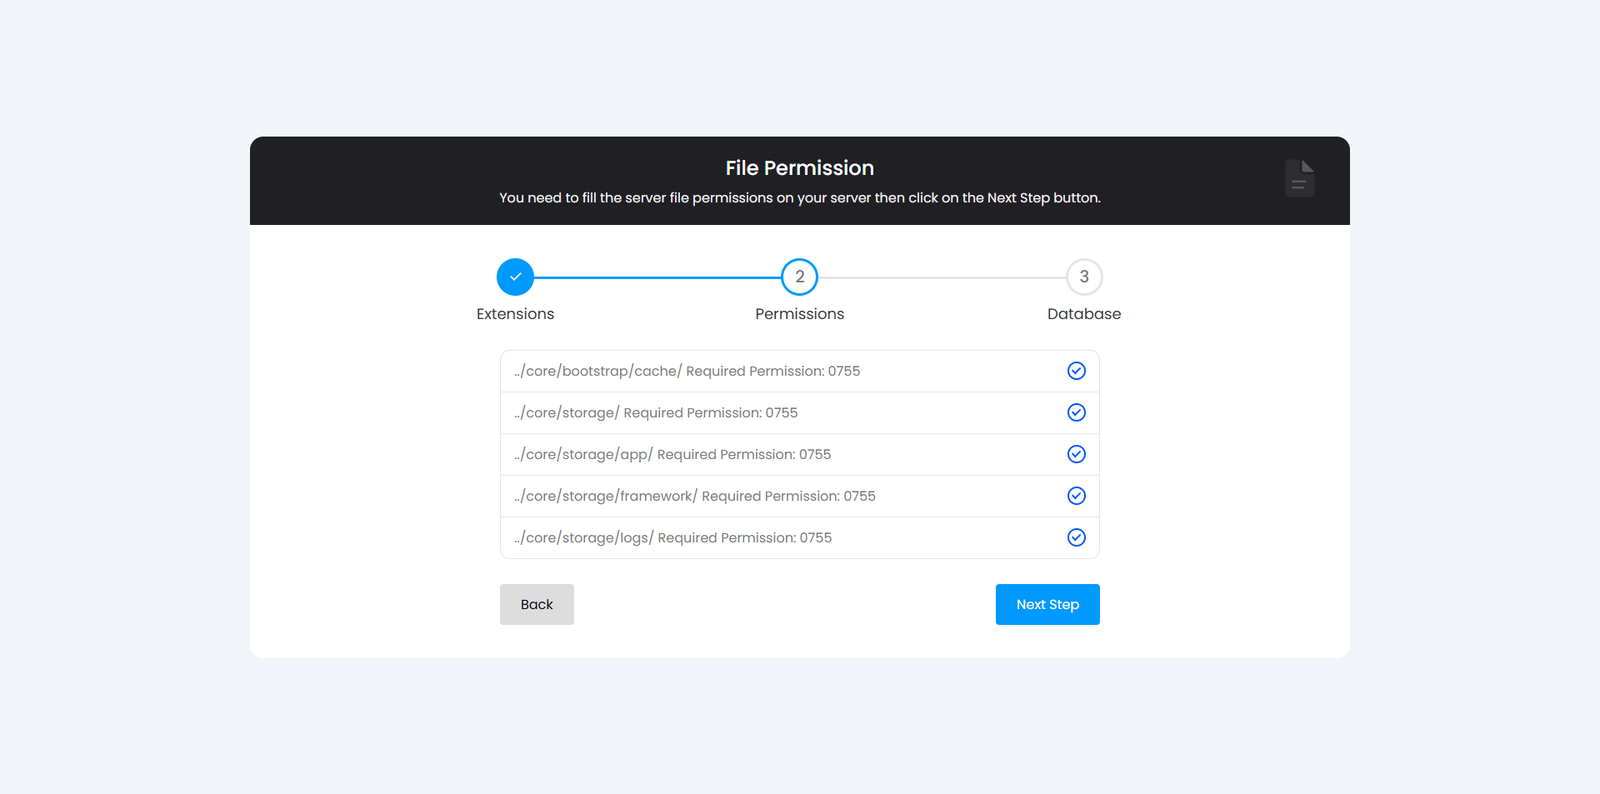
You need to fill the server file permissions on your server then click on the Next Step button.
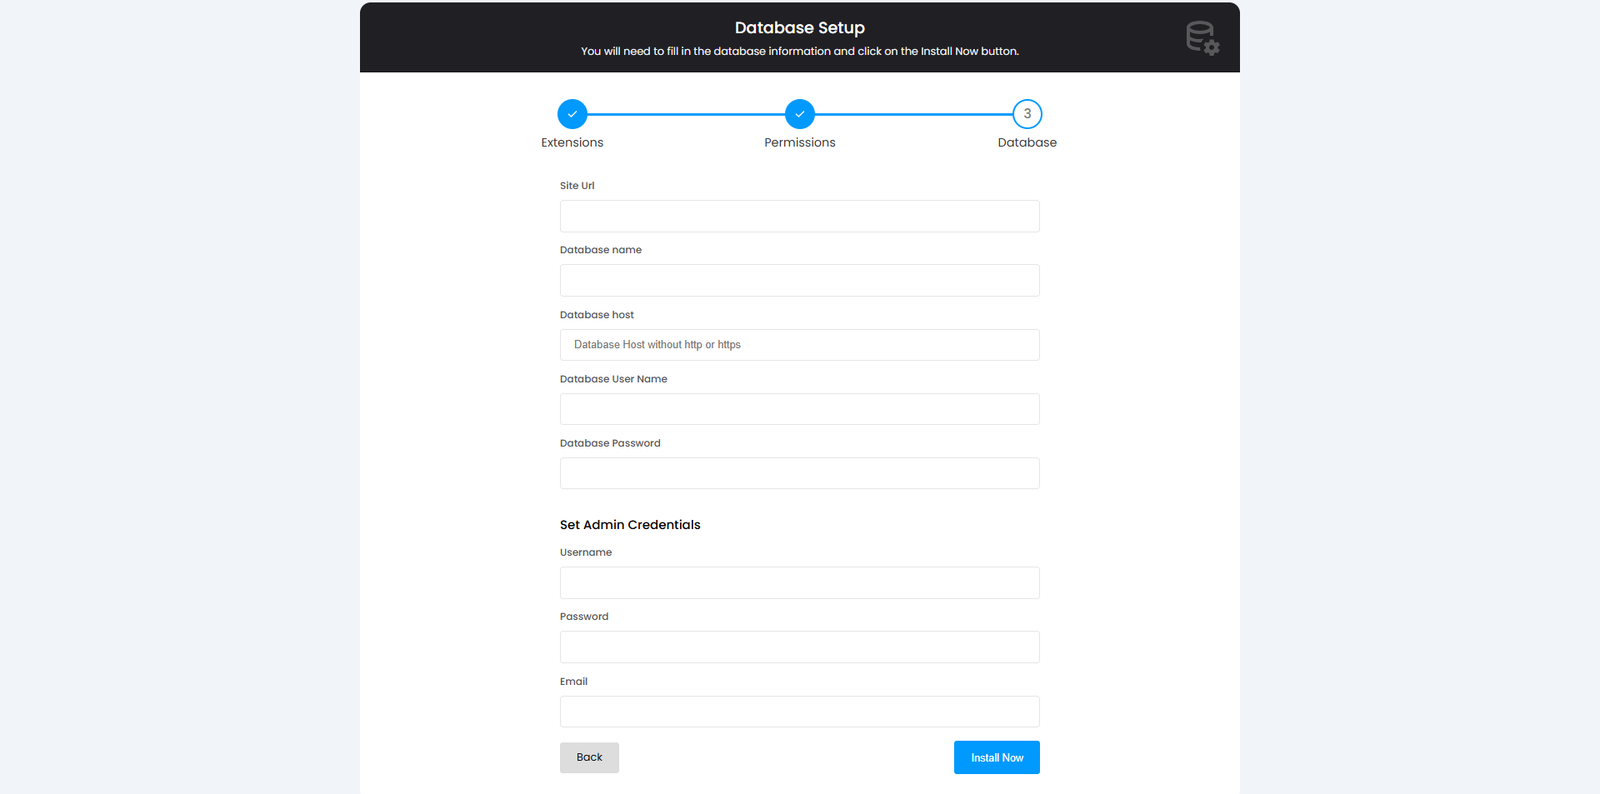
You will need to fill in the database information and click on the Install Now button.
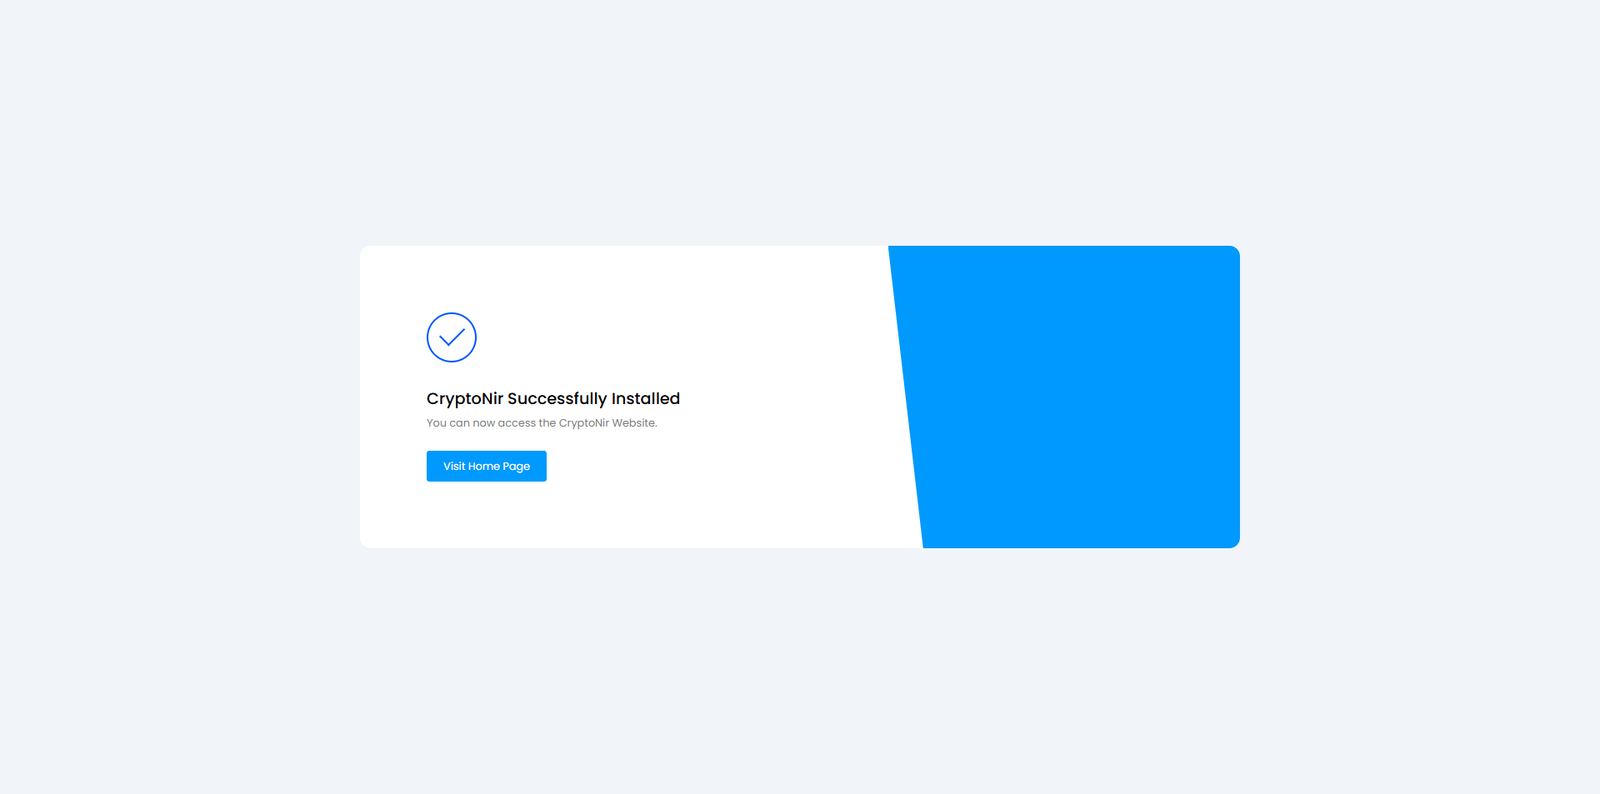
Congratulations! You have successfully installed CryptoNir . Click on the Visit Home Page button OR reload your domain URL. You can see your website
CryptoNir installing video cPanel and hostinger hosting panel
Admin Login Access
Admin Access: type your domain url/admin/login || Example:
https://yoursite.com/admin/login
Email: enter your email
Password: enter your password
Admin Dashboard
Dashboard
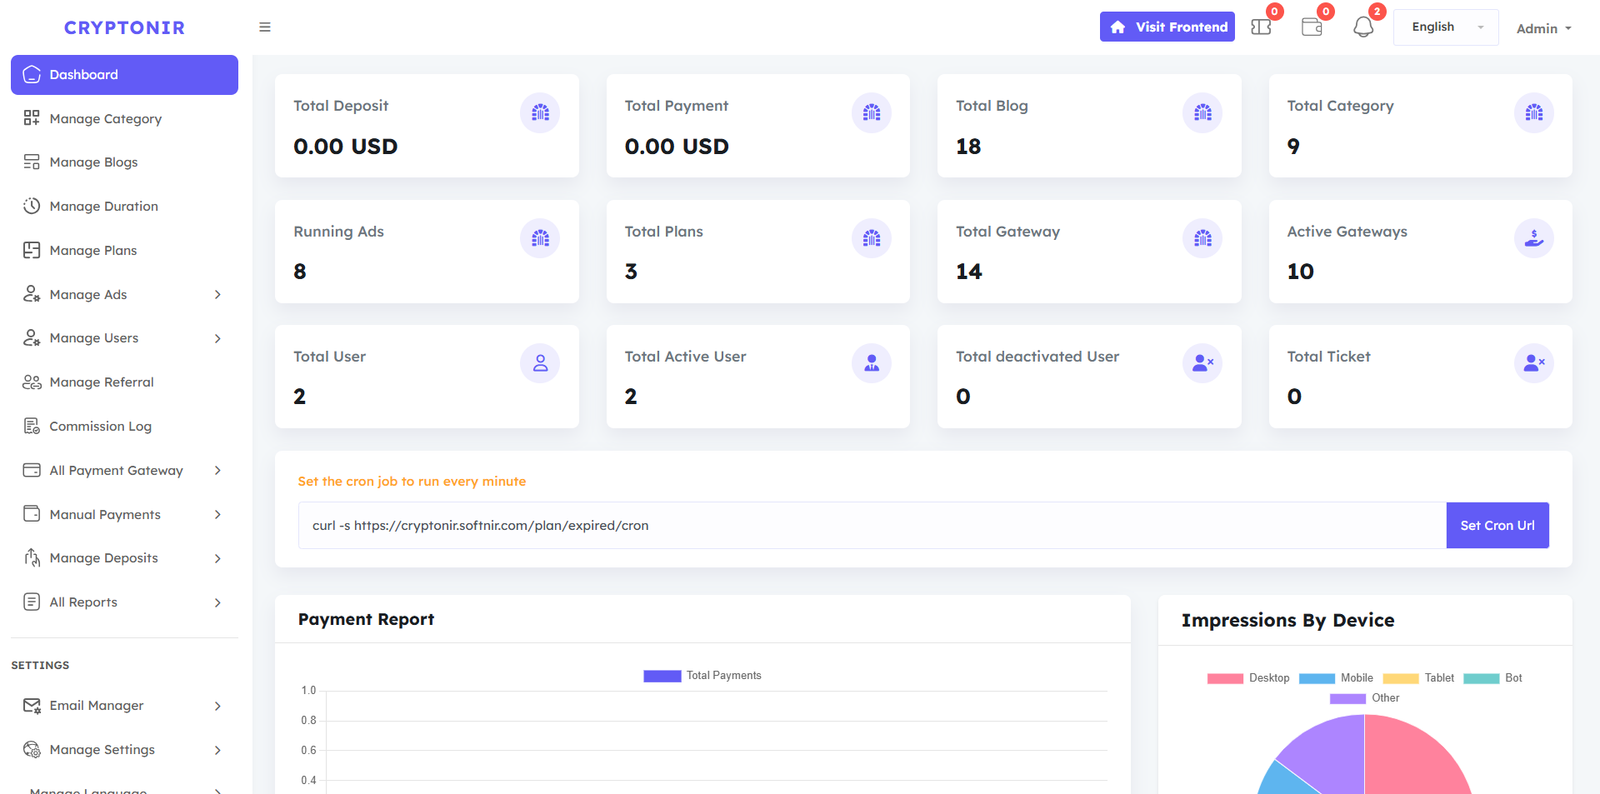
From here, you may control all of the fundamental data on the website. In the Dashboard admin can see the website overview: Total Deposit, Total Payment, Total Blog, Total Category, Running Ads, Total Plans, Total Gateway, Active Gateways, Total User, Total Active User, Total deactivated User, Total Ticket, Payment Report, Daily Trends (Last 30 Days), Top 10 Most Viewed Blogs, Impressions by Device,
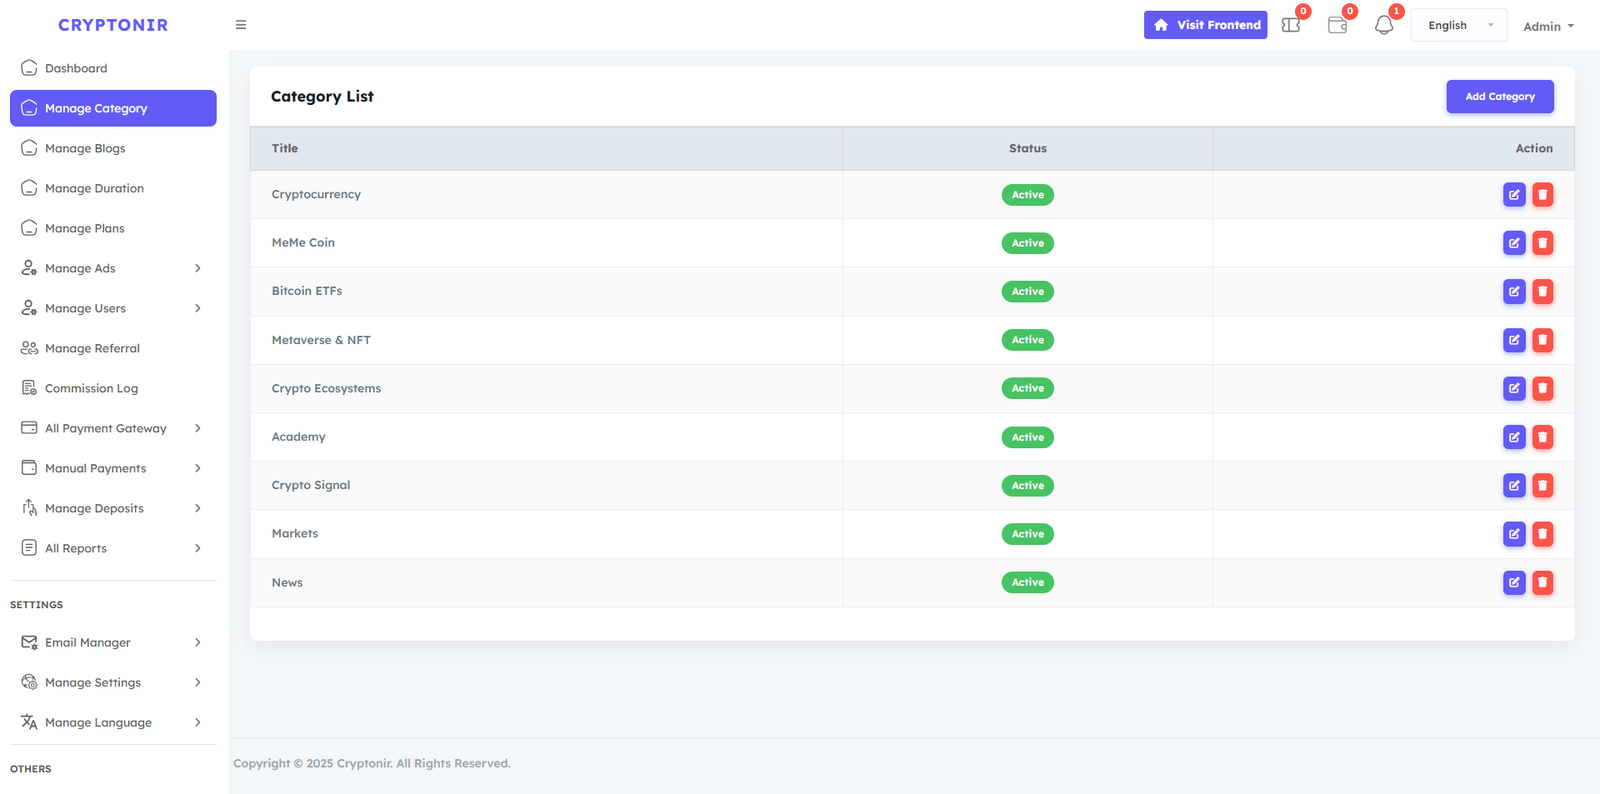
Manage Category
There is a Manage Category option, the admin can create, update, edit, and delete categories as per his/her requirement, and can keep the status as inactive and Active. Admin can manage everything according to their needs without any coding.
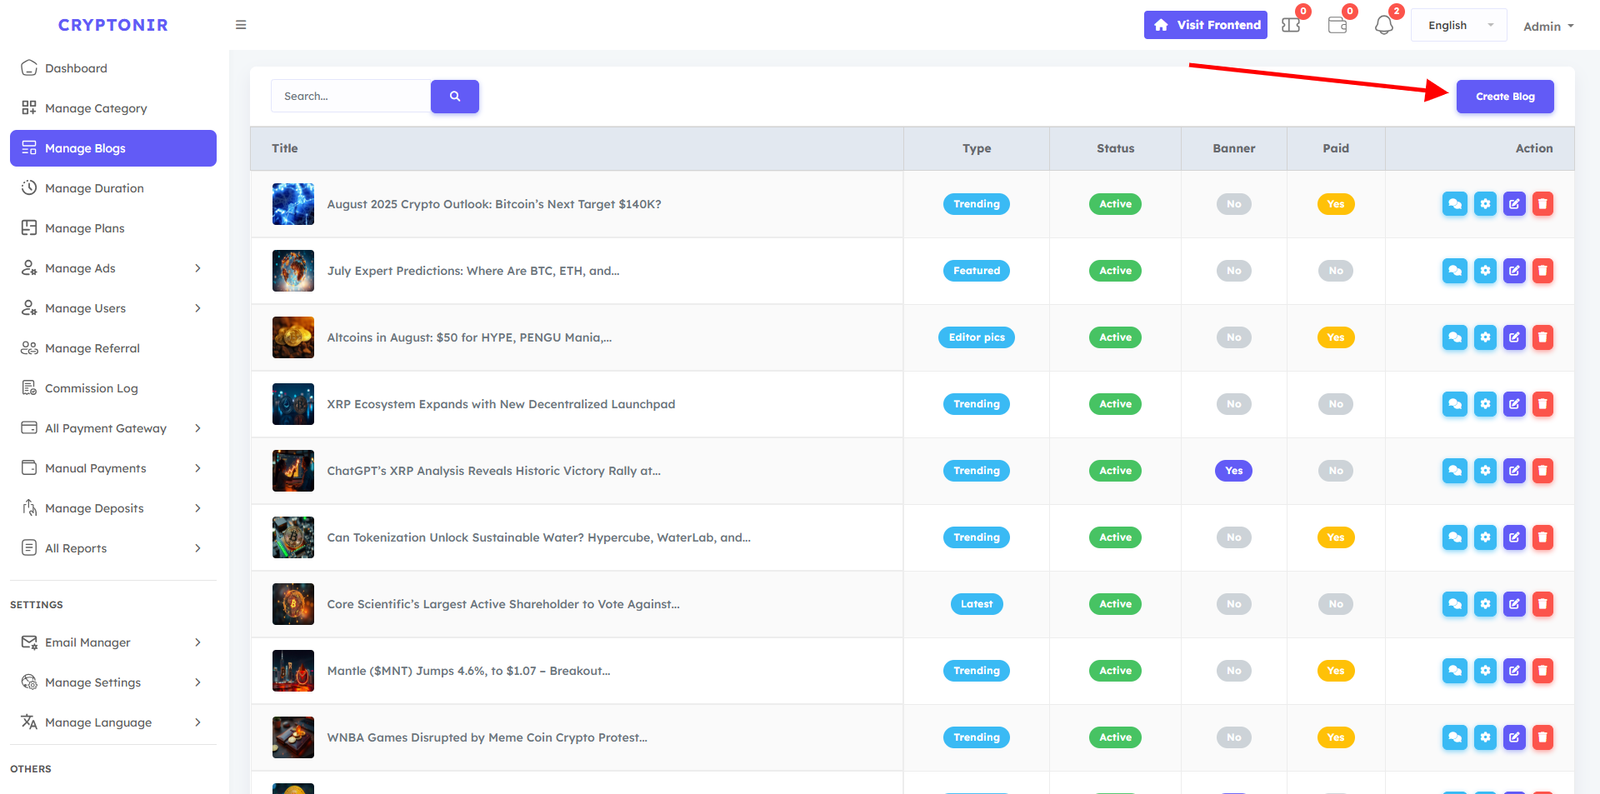
Manage Blogs
From the Manage Blogs option, the admin can create, update, and delete Blogs in specific categories as needed. While creating a blog, the admin will create a blog with the necessary information of the blog. If the admin wants, he can keep a free blog, and he can keep a paid blog. If the admin keeps a paid blog, then the User must buy a subscription, and then the user sees the complete blog details. If the admin keeps a free blog, then the customer will be able to view the blogs directly. The languages on the website will be displayed in the create blog option. You can translate the blogs in a specific way from the create blog, and they will be shown on the website according to the language. The information that the admin will use when creating the blog is given below.
- Title: Here, you can type the blog title, and it will not be possible to create two blogs with the same title because we have made it a unique blog Title. Admin will type the specific title of his specific blog here.
- Short Description: Here you can type the blog's short description.
- Description: From the Description option, the blog can be described in detail, and it can be made colorful, with images that can be added, and various links can be added. While creating a blog, Admin can customize the blog in detail according to their needs from here.
- SEO Fields (Optional): Here you can type the blog's Meta Title, Meta Description.
- Category: The Category option will show all the active categories on the website. From here, the admin can select a category of his choice under which he wants to keep this particular blog.
- Blog Type: From the blog type option, the specific blog will be a blog of which type, Featured, Latest, or Trending. Editor pics will be selected. From here, if the admin selects a section, this blog will be displayed under that section.
- Blog Thumbnail Image: The main image for a specific blog can be uploaded from here.
- Show Banner: If yes is selected from the banner option, then this Blog will be displayed in the banner. If no is selected, then it will not be displayed in the banner. We have placed the latest three blogs in the banner option. If Yes is selected in the Show Banner option while creating the Blog, the latest entry will be shown in the Blog banner.
- Is Paid?: The admin will select from here whether the blog will be a free Blog or a paid blog. If a free blog is set, then users will be able to view the blog for free. If a paid blog is selected, then the user will have to buy a subscription, and then the user can view these blogs.
- Status: From here, the blog can be made active or inactive. If active, the website will display a blog. If not, it will not be displayed.
- Meta Description: Meta Keywords specific to a particular blog can be typed in here.
Common Fields :
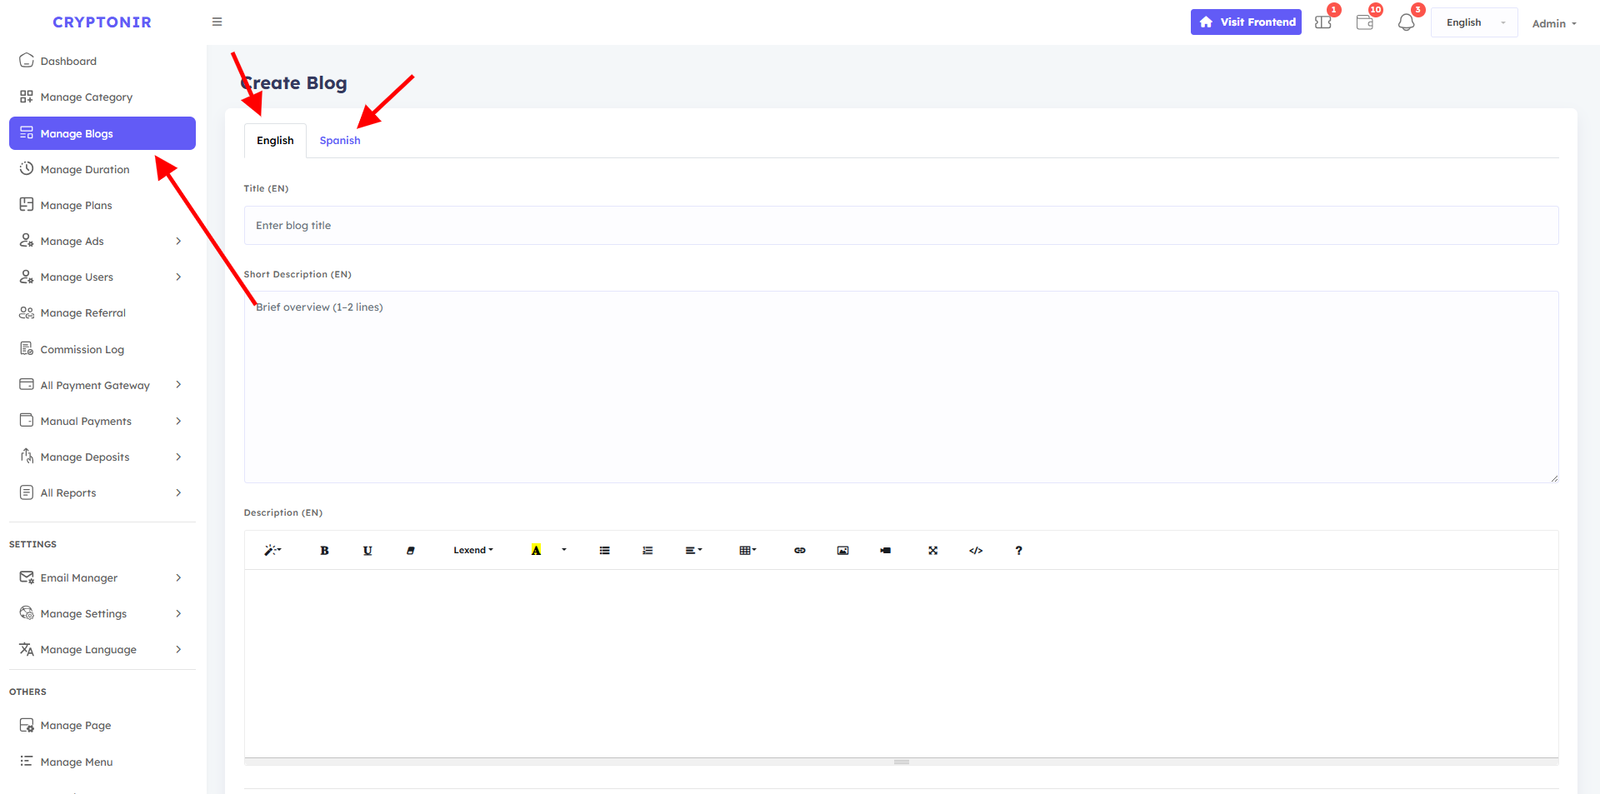
Create Blog
By clicking on "Create Blog," the admin will be able to view the information field for creating the blog, where all the languages on the website will be displayed in a tab form. If the admin clicks on the English tab, the content will be arranged in English. If they click on Spanish, they will be able to arrange the blog with Spanish text and add it.
Blog comments Button
By clicking on this button, you can see all the comments, and then, if the admin wants, they can hide the comments from the frontend or show them as they wish.
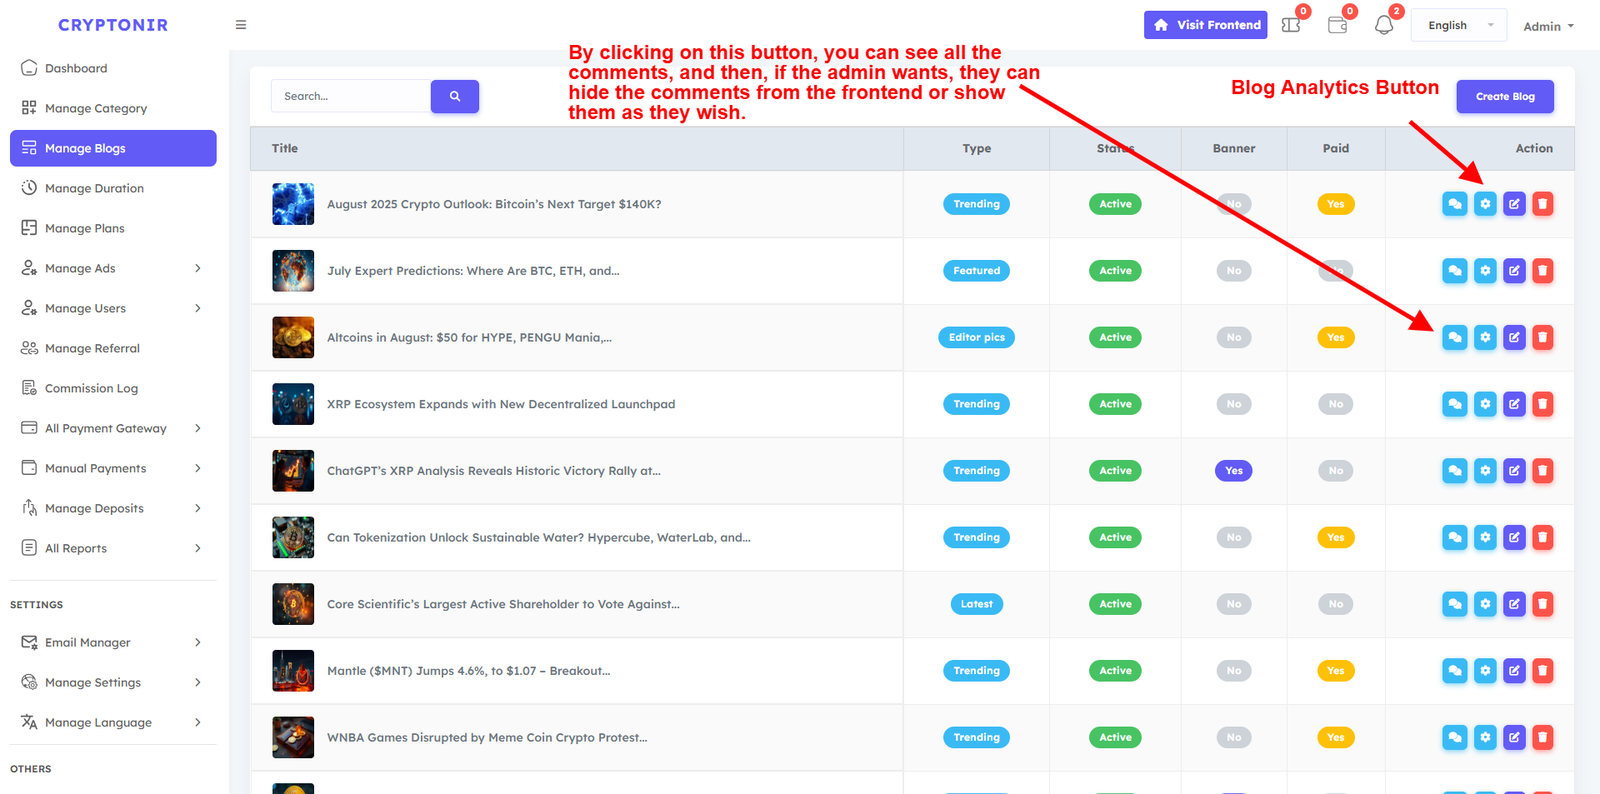
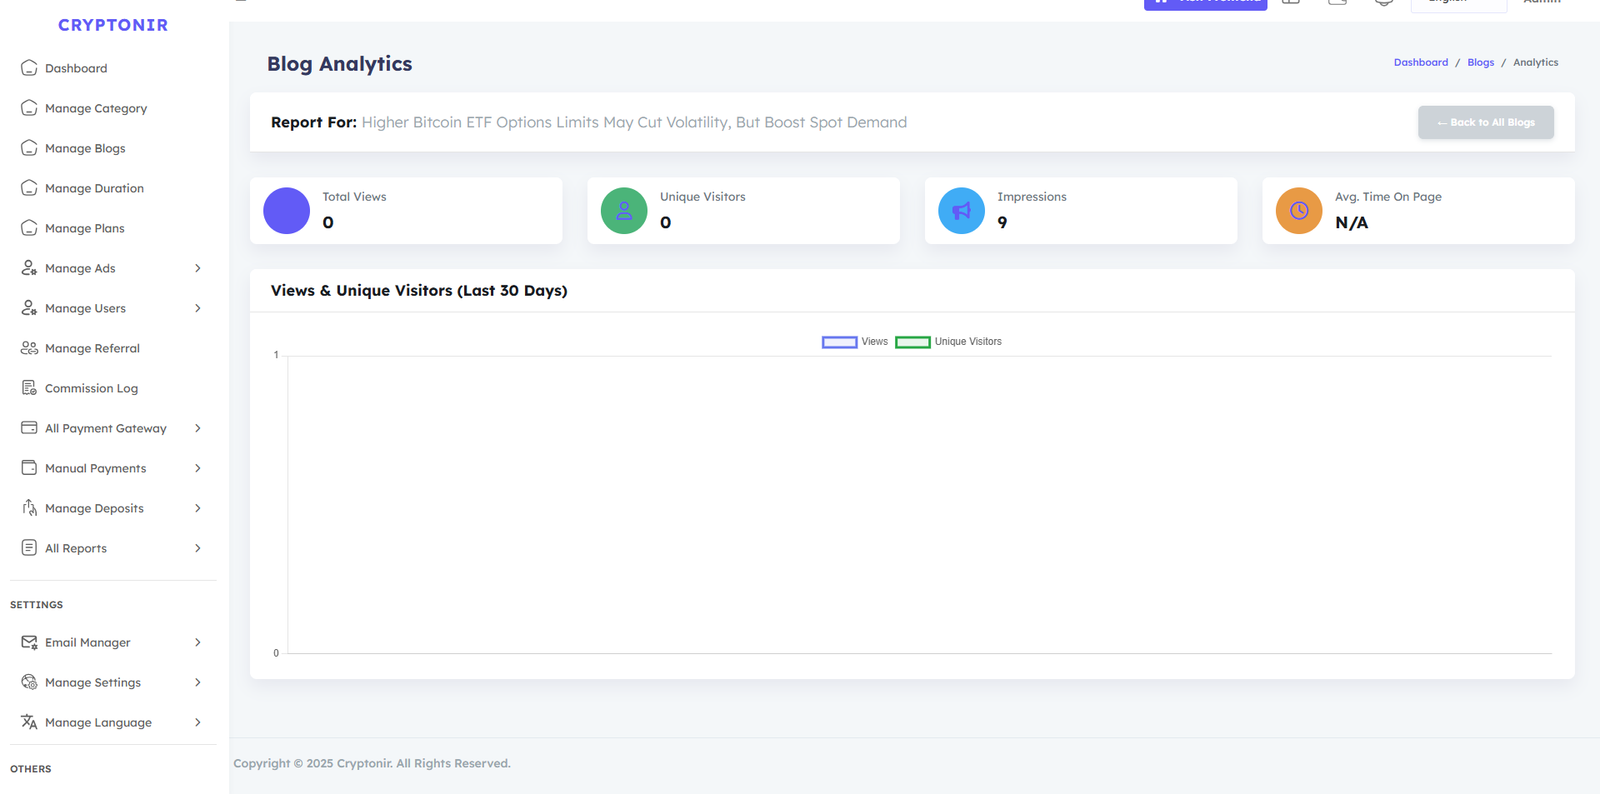
Blog Analytics Button
Here, the Blog Analytics of a specific blog will be shown in a specific way. Each blog will be automatically created with this kind of analysis. The admin can easily understand how many views and impressions his blog has received.
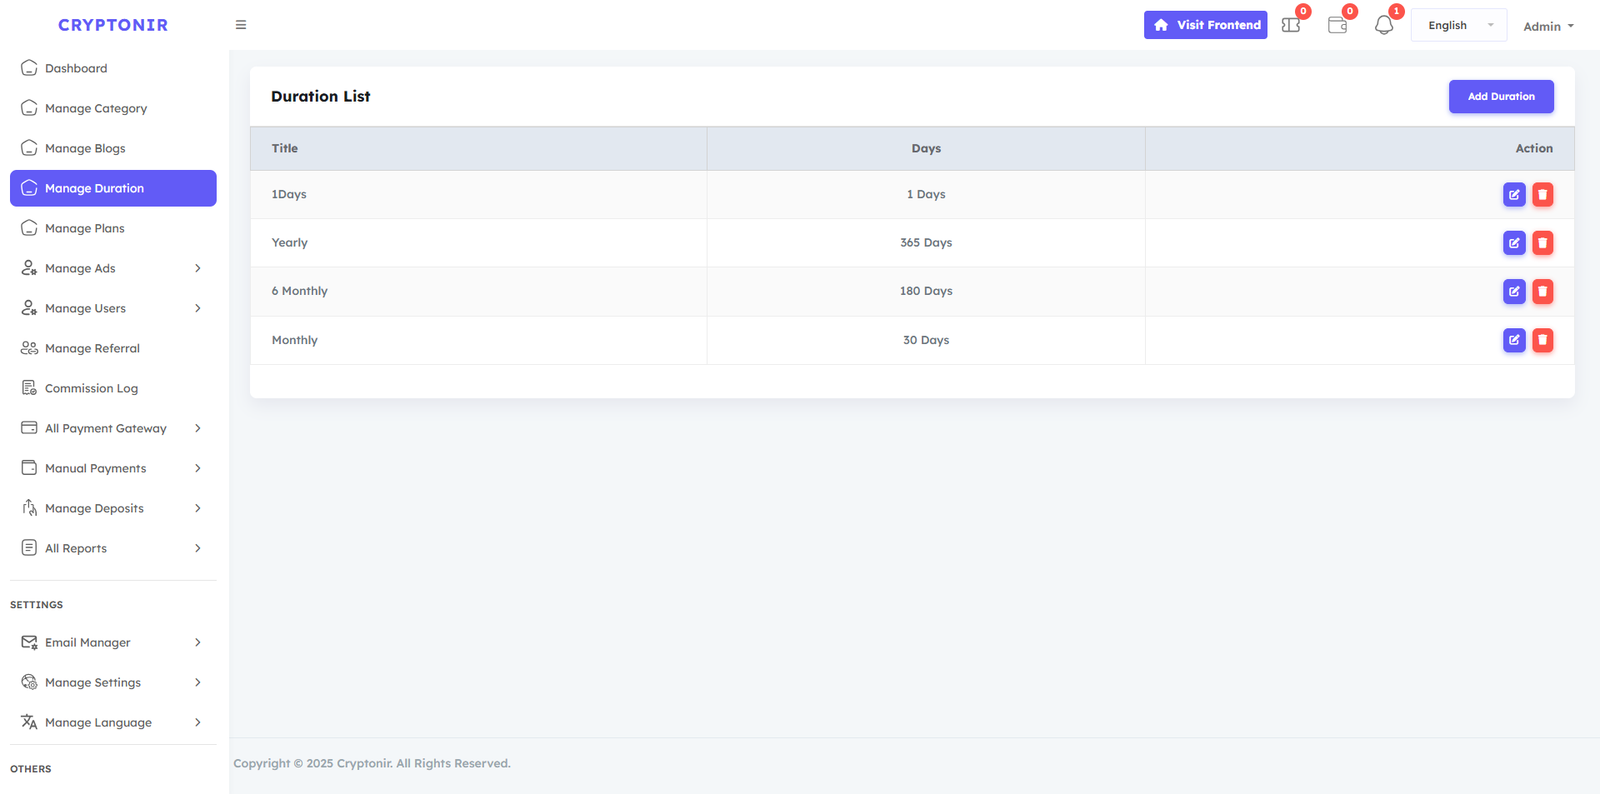
Manage Duration
The times of a specific plan will be calculated from the Manage Duration option. For example, if you select 1 year while creating the plan, then 365 days will be counted, and if you select One Month, then your 30 days will be counted. Admin can set the plan time duration in days from here as he wishes.
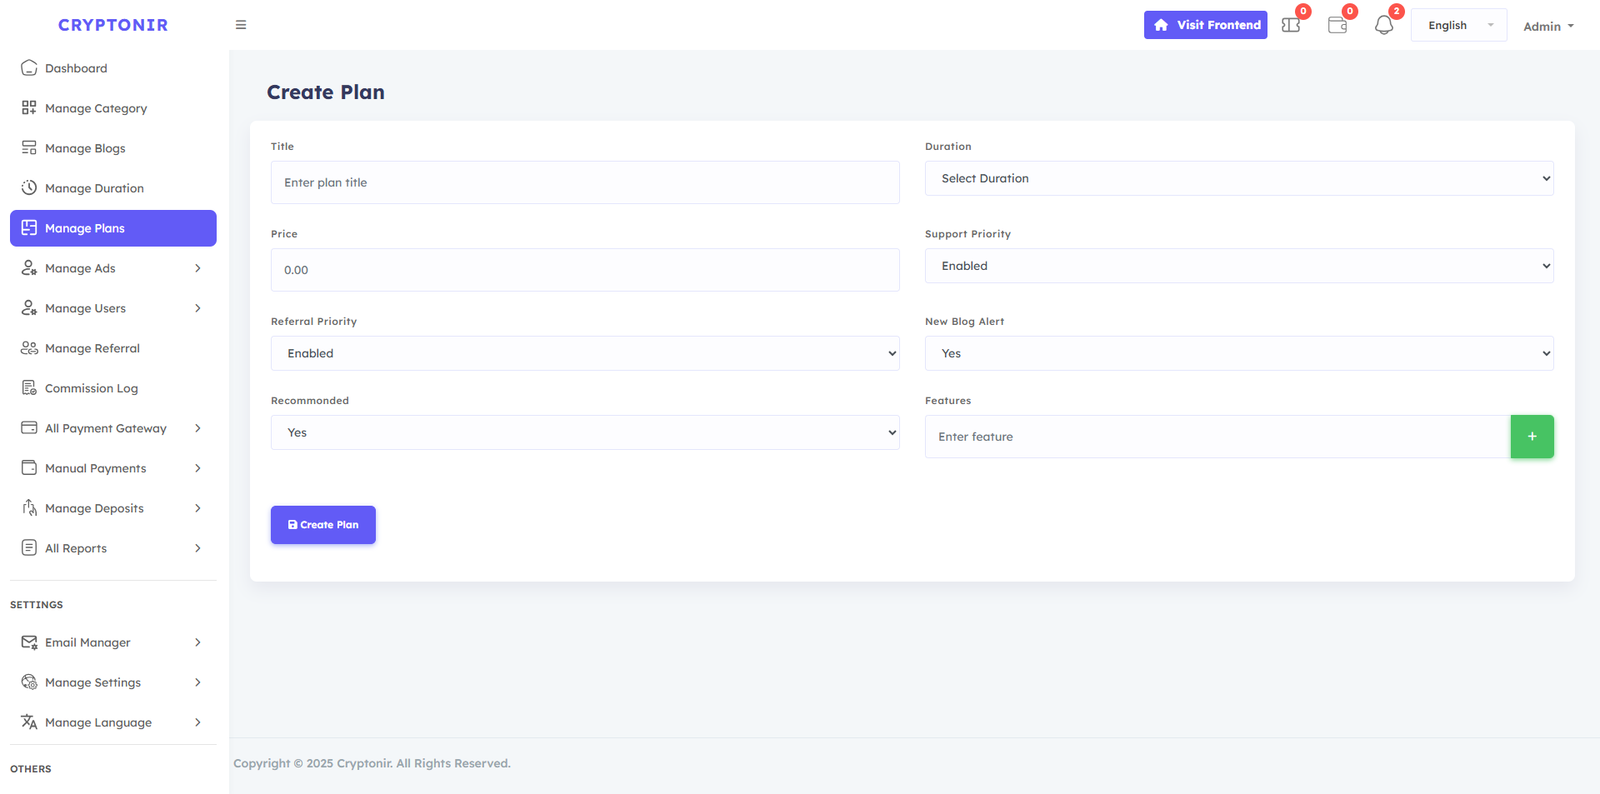
Manage Plan
In the Manage Plan section, from the Create Plan option, you can create an unlimited Premium blog Plan of your choice and customize all the information as you wish. And edit all Information as you wish. After buying these premium plans, customers will be able to view premium paid blogs.
create plan
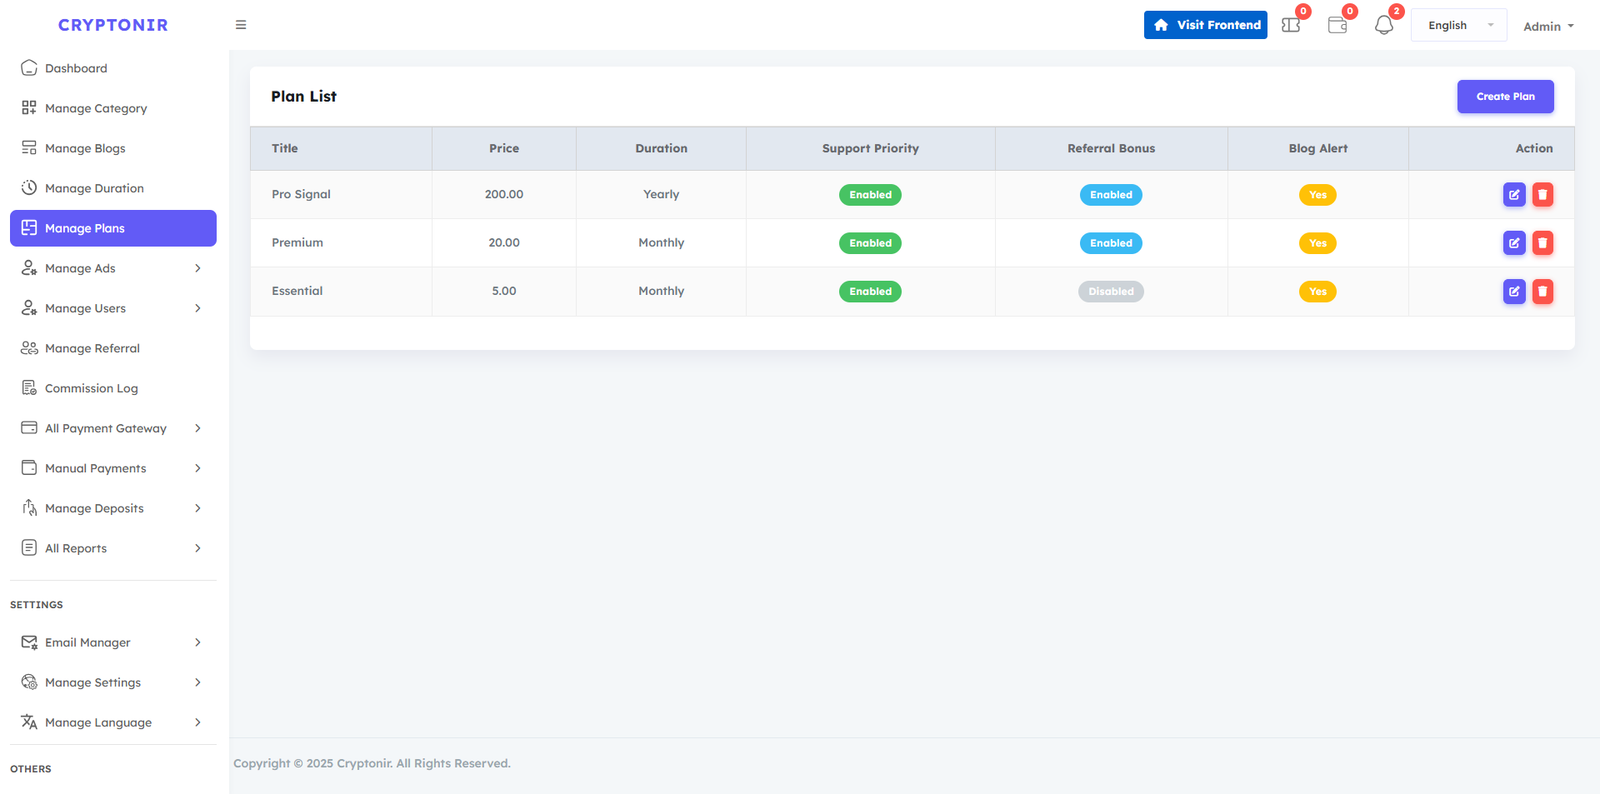
plan List
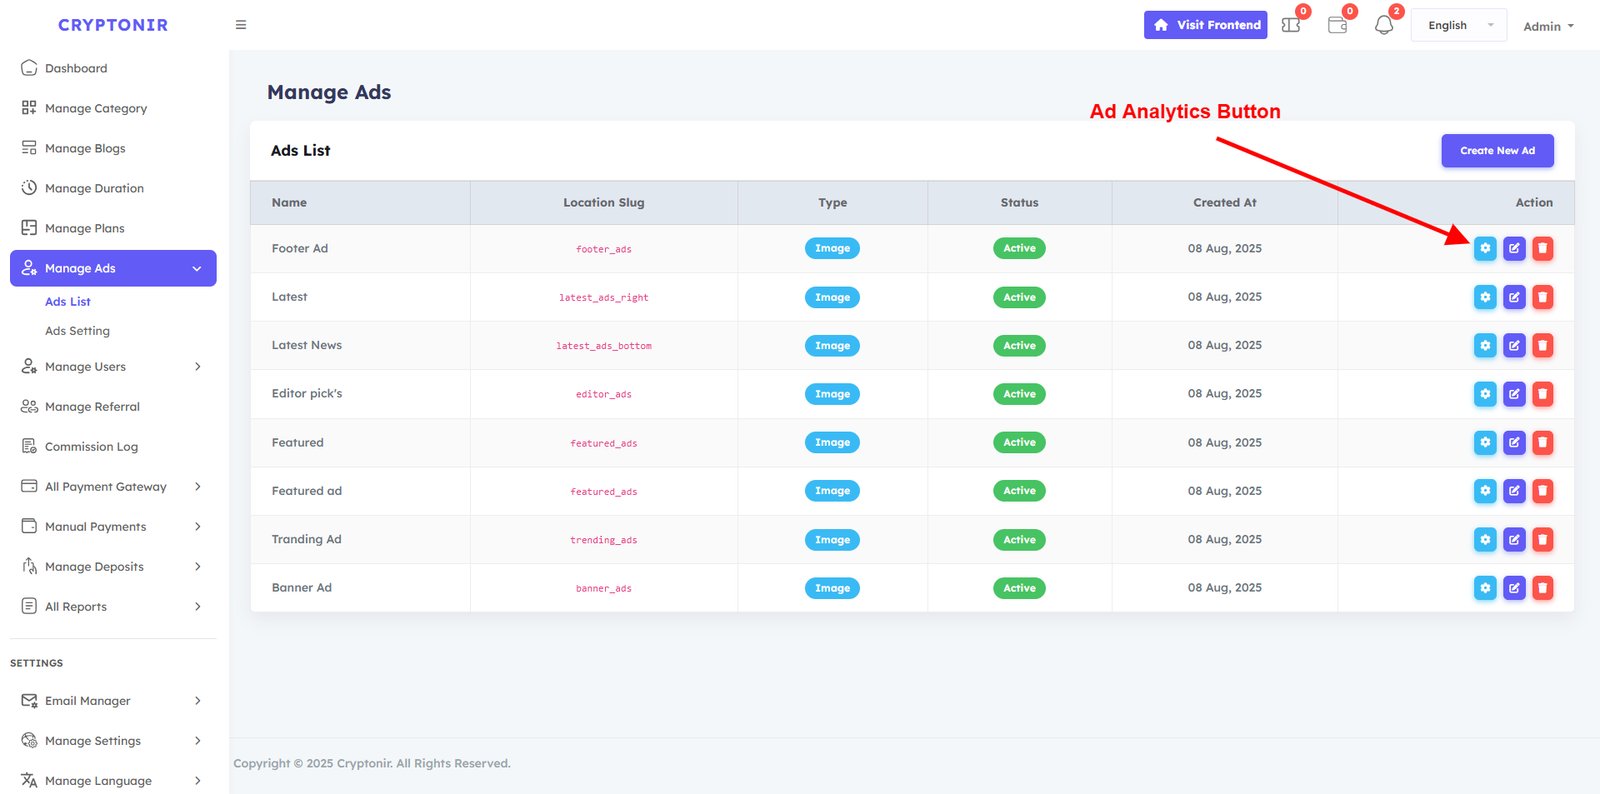
Manage Ads
From the Manage ats option, the admin can create, update, and delete various ads in different sections of the website. For the beauty of the design, we have fixed specific ad sections in specific sections. Admin can select and display ads in those sections from the Create Ads option. In the ads option, the admin will be able to see another option, the Ad Analytics button. By clicking on the Ad Analytics button. By creating ad analysis, the admin will be able to see accurate feedback on Total Impressions and Total Clicks on their ads.
- Ad Name: Here, you can type the ad Name.
- Website Ad Location: In which section of the website the ads will be displayed, and what will be the banner size of the ads; those can be specified from here, and the image will have to be uploaded accordingly.
- Ad Type:Code (HTML/JS), Image Upload. If you select the image option from this option, the image will be displayed below, and if you select the code option, paste the HTML code of your campaign below and click on it Update Ad button, the ads will be created.
- Status:From here, the ad can be made active or inactive. If active, the website will display an ad. If not, it will not be displayed.
Ads Settings
If we go to the Ads Settings option, select the Enabled option, then all active ads will be displayed on the website, and if we select the Disabled option, none will be displayed on the website
Manage Users
There are three options in the Manage Users option: All Users, Active Users, Deactive Users , All Users option will show all users Active Deactive , Active Users option will show only Active Users , Deactive users option will show only Deactive users .
Each user has two buttons available, one is the edit button and the other is the Login as user button.
After clicking on the edit button, you will be able to see the user details page from where you can add or Subtract the balance of the user account and edit all the personal information of the user, such as name, phone number, country code, state, or if you want, you can Inactive or active the user.
By clicking the Login as user button, you can visit that user dashboard.

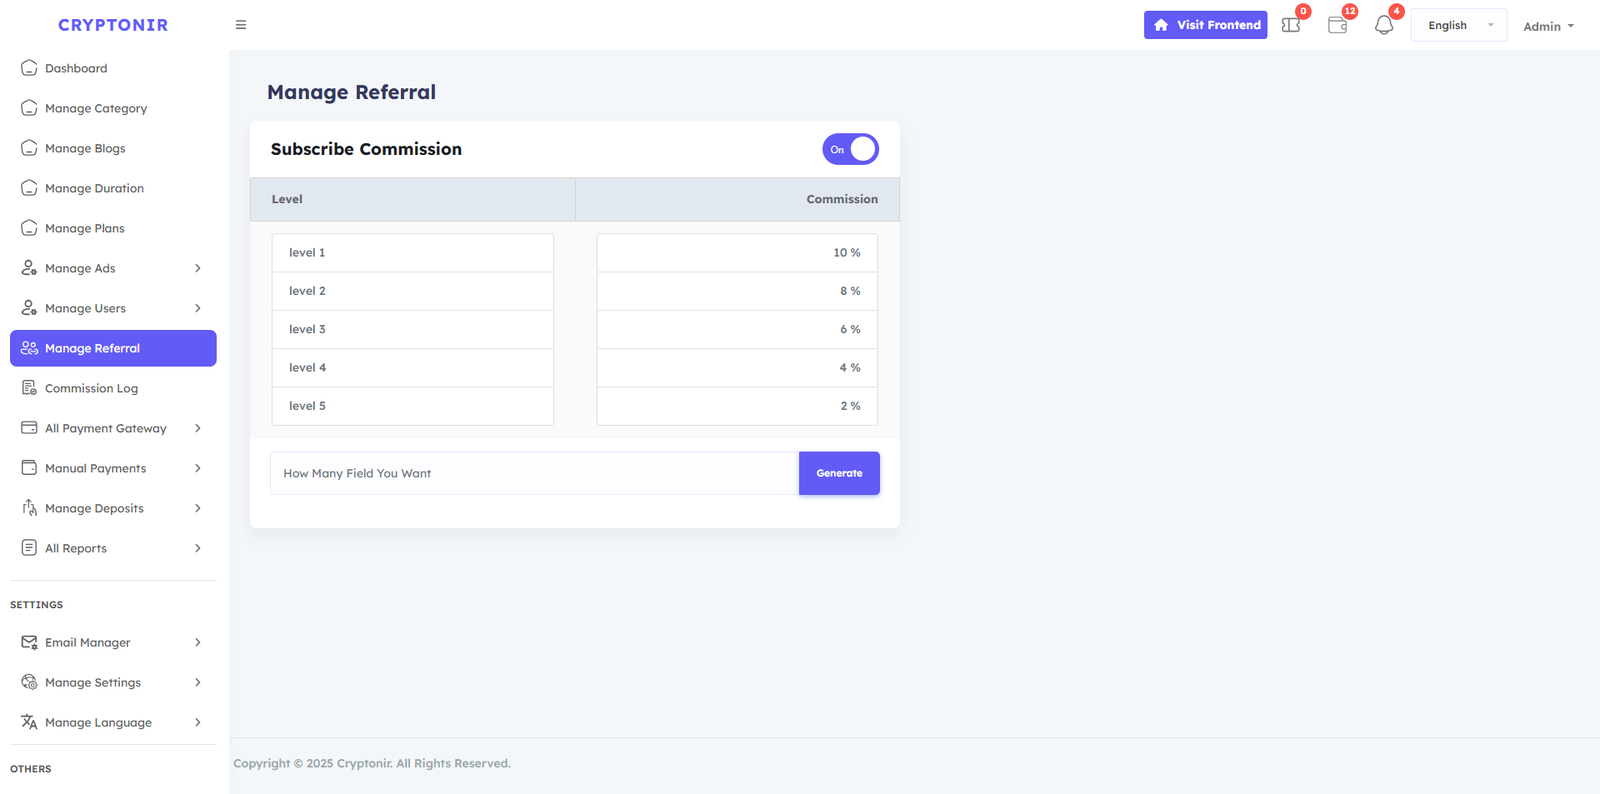
Manage Referral
This is a program that manages affiliate referrals, and here you can make multi-level referral commissions. You can set the referral level up to a maximum of 5. Just input how many levels you want. Then click on the Generate button, and you will be able to see the levels. Then set the level of Plan Subscribe Commission as you wish. After typing the commission percentage, click the Create button, and it will be automatically set up. If you want to keep the commission on or off, you can turn it on or off by clicking the button above.
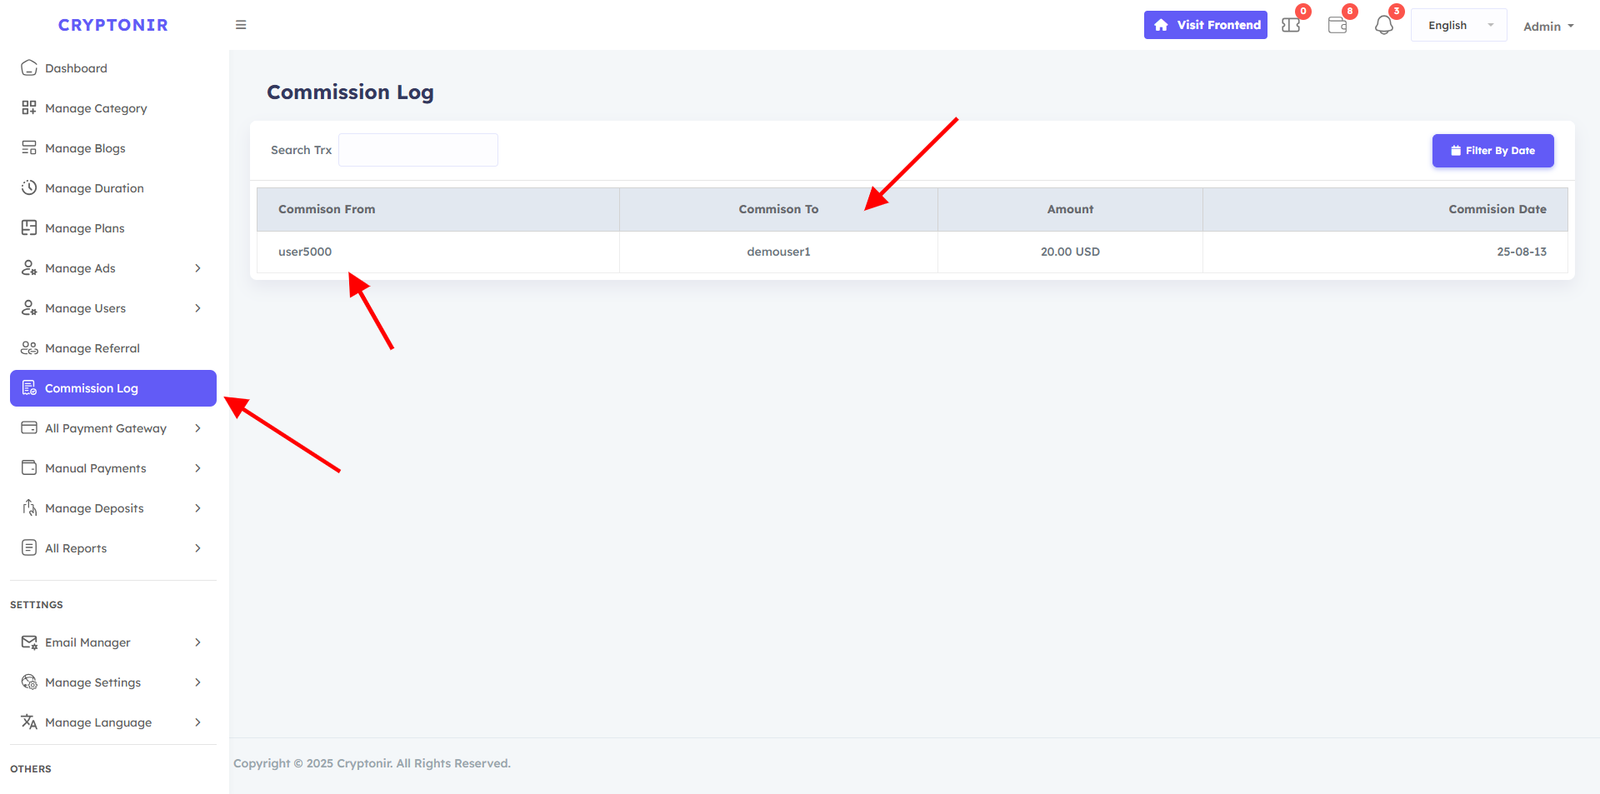
Commission Log
In the Admin Commission Log option, you can see all records of when a user has received a commission, or you can search for a specific user to see their commission-received records. And you can see which user received the commission from which user and on what date.
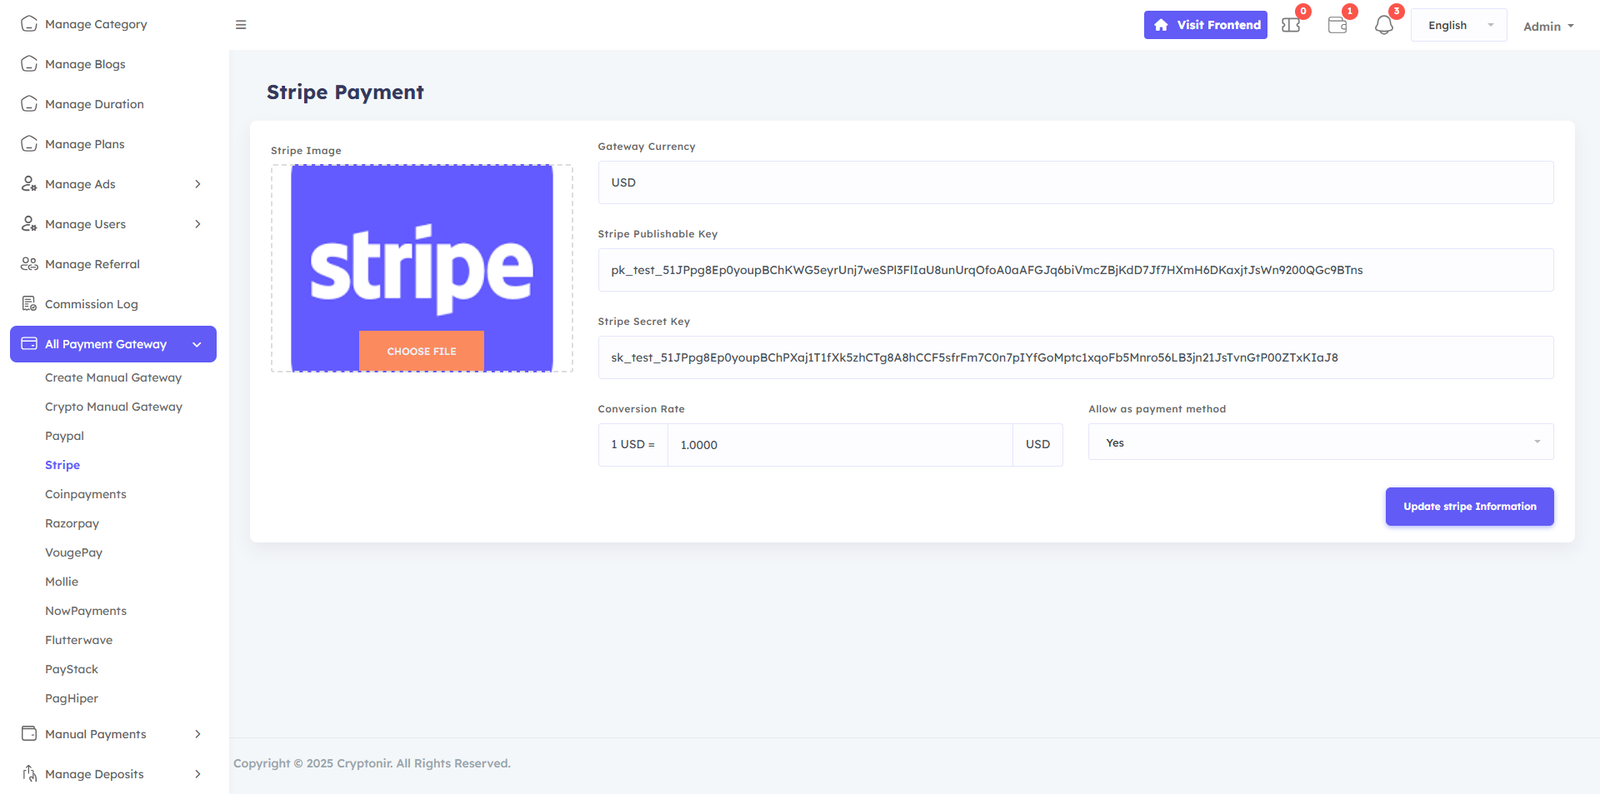
All Payment Gateway
All Payment Gateway options. Here are all the payment Gateways on the website, both online gateways and manual payment gateways. If you keep the payment gateways active, they will be shown to the users, and if you keep them inactive, they will not be shown. In the Create Manual Payment Gateway option, you can add unlimited manual payment gateways, and in the crypto manual gateway, you can add any crypto address or wallet by editing it, USDT or BTC, or anything else. Customize your payment Gateway as per your needs, just by editing and updating.
Create Manual Gateway, Crypto Manual Gateway, Paypal, Stripe, Coinpayments, Razorpay, VougePay, Mollie, NowPayments, Flutterwave, PayStack, PagHiper, you can manage the Payment Gateway. And this dynamic, so you can easily set up all the things.
You go to the Gateway option and provide your gateway's real information and update it. Then the gateway will work. We have provided all the test key information.
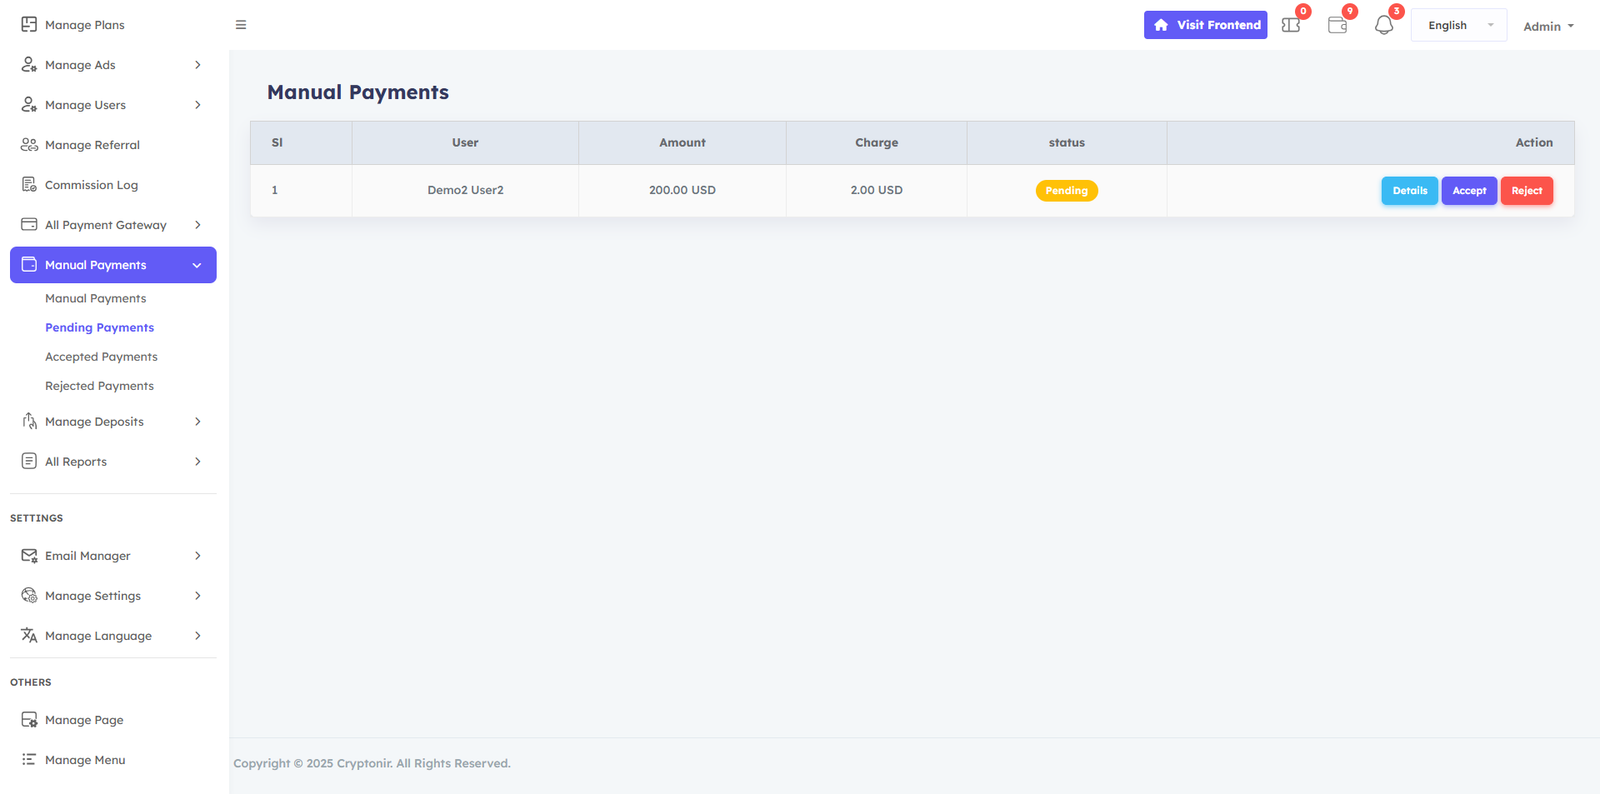
Manual Payments
In the Manual Payment Options, you can see a list of all manual payments Pending made by users. You can specifically view the user's payment details and Accept them if it is correct or Reject payments if they are incorrect.
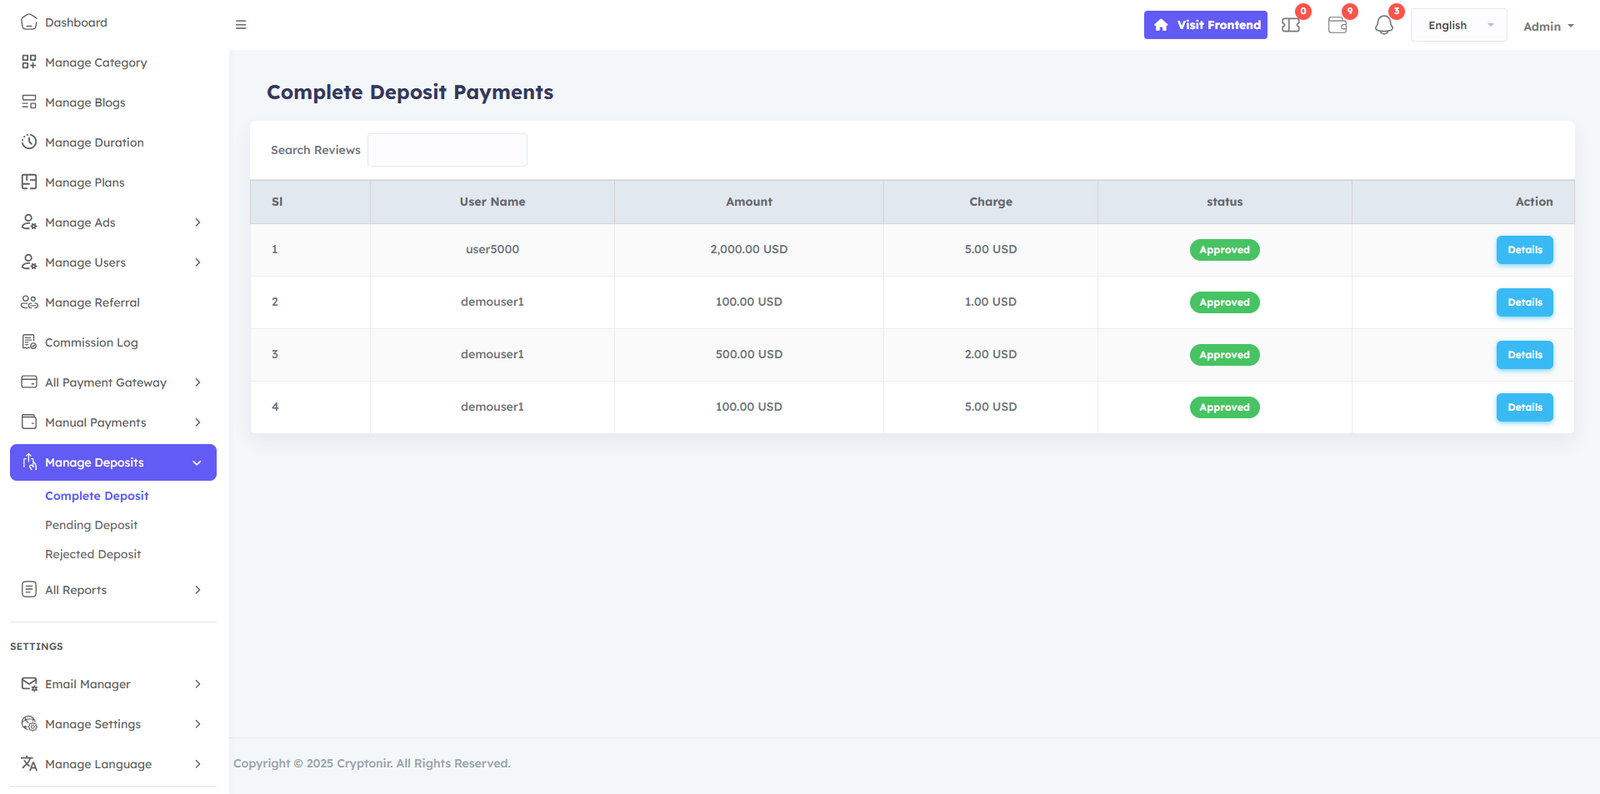
Manage Deposit
There are two types of deposit gateways, one is an online gateway and the other is a manual gateway. If the customer makes a deposit using the online gateways , the deposit will be made directly.
In the Manual Manage Deposit, you can see a list of all pending Manage Deposit payments made by users. You can specifically view the user's Manage Deposit payment details and accept it if it is correct or reject it if it is incorrect.
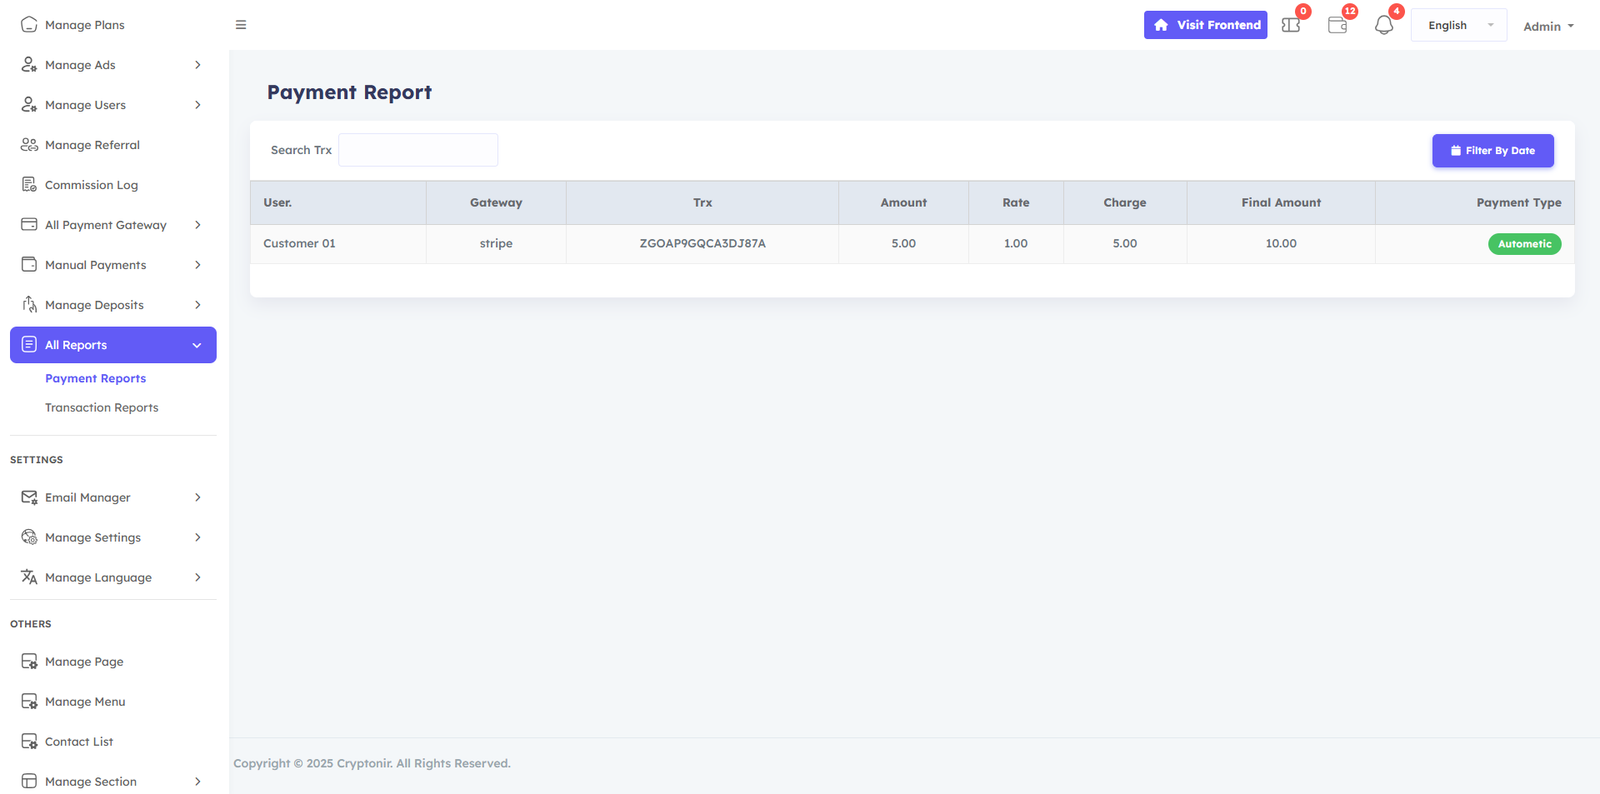
All Reports
The All Reports menu in the Admin dashboard provides a detailed record of all Payment reports and Transaction reports made on the website. It helps the admin track successful Payment reports, Transaction reports, and any issues that need attention. This report ensures accurate financial reporting, aids in resolving payment-related queries, and enhances transparency in managing customer payments.
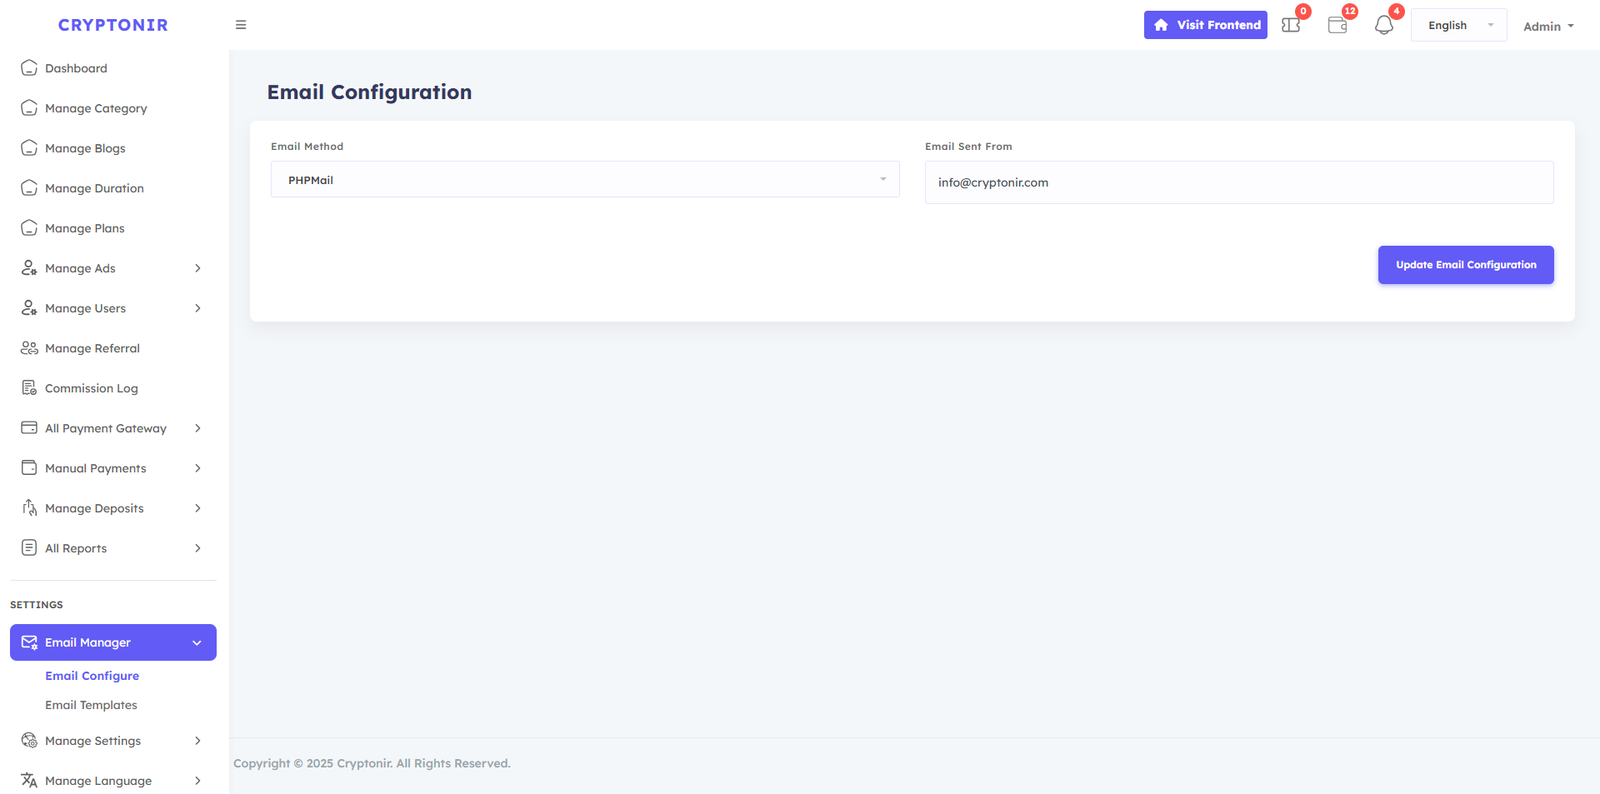
Email Manager
Email manager option, 2 options available, Email configure and Email templates. You can edit and update your emails and notifications in the Email template if you want.
There are 2 Email method in the Email configure: - 1: Phpmail, 2 :Smtp mail . To use Phpmail, you just need seleted Phpmail next set your server email and click the Update email configuration button. server email example : info@domainname.com
To use SMTP mail, first you need to select SMTP mail. Then you need to fill in the options that you will see. The information must be specific email information for your server email.
Manage Settings
The available options in the Manage settings option are General settings, Preload setting, Google Analytics, Socialite setting, Cookie consent, Google Recaptcha, and Global SEO Manager..
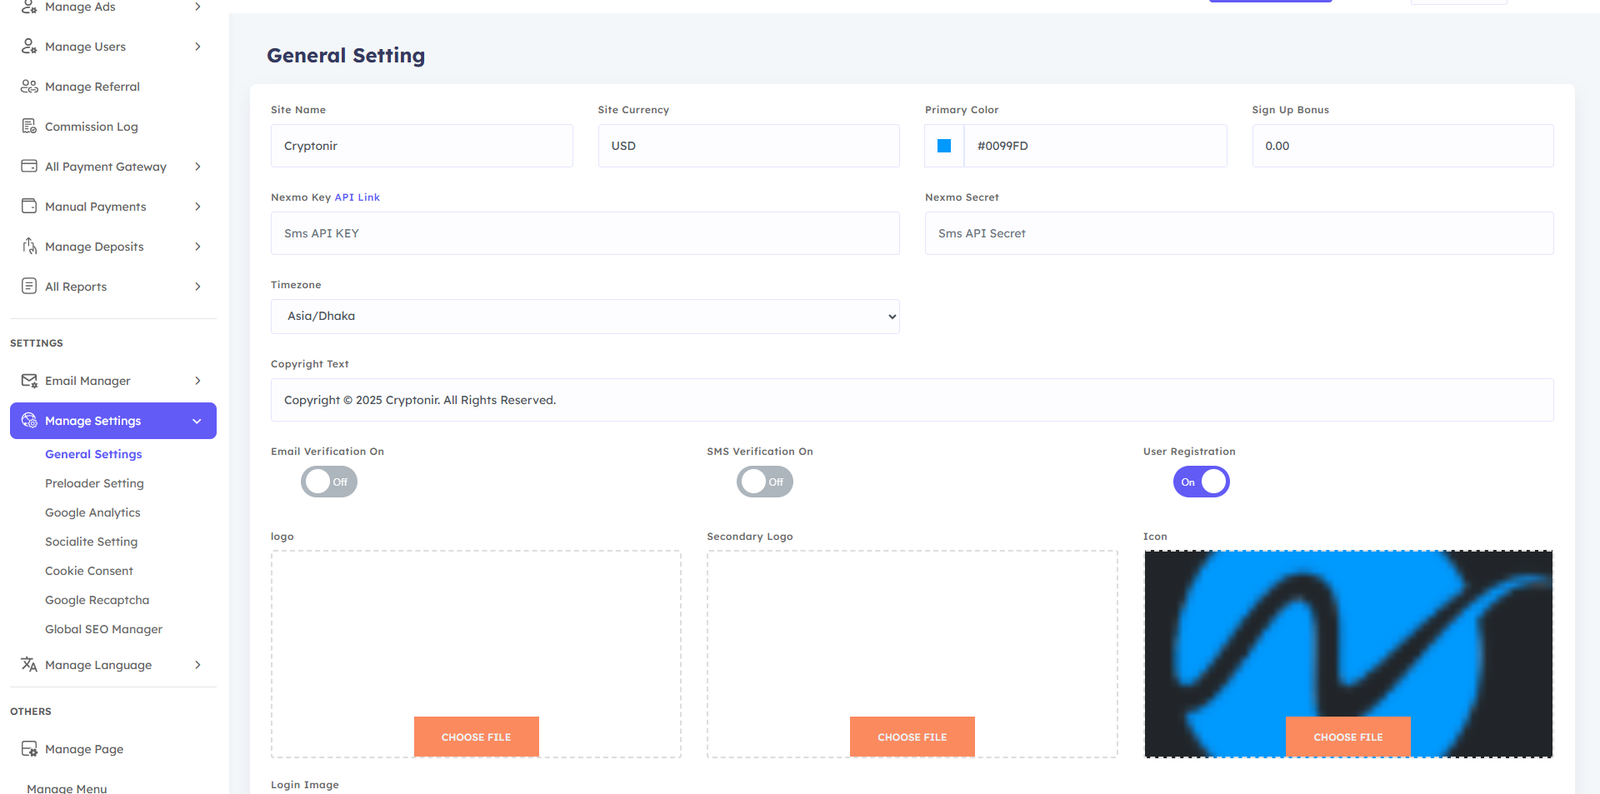
From the General setting, you can set Site name, Site currency, Primary color, Sign up bonus, Timezone, Copyright text, logo icon, and all login User registration image and You can customize it as per your wish and click on the Update General button to save it. Another option in General Settings is Nexmo SMS. You need to login to your Nexmo account and set the Nexmo API key and Nexmo secret, and then Update General button to save it .
There are three button in the general settings: Email verification on, Sms verification on, and User registration. You can turn on any of them if you want to allow them, and you can turn them off or on by clicking on the button.
If you are showing the Preloader website, select this yes and update it. If you are not showing it on the website, select No and update it.
If you need Google analytic, paste the your Analytics id here and select Yes then update. If you don't need it, select No and update.
This option allows users to login and register via Google email and Facebook account . If you want to use this option, you need to add Google client id and Facebook client id and Facebook callback url and update it with Active Status. If you don't want to use it, you can Inactive it.
You can turn the Allow cookie modal on or off by selecting Yes or No and you can change the contents in the cookie text button and save the cookie . You can also customize it. cookie modal short description
If you want to use Google recaptcha on your website, select Yes on the select button and set the Recaptcha key and Recaptcha secret and click on the Update button. If you want to turn it off, select No and update.
You can type different types of keyword content here that will help with your website's SEO.
Manage Language
Step 1:
In Manage language, you can add or delete languages As you wish and if necessary, if you want to add a new language, then first you have to click on the Create Language button and then see the language name and language short code. After typing the language name and language short code, click on the create button. Your new language will be created.

Step 2:
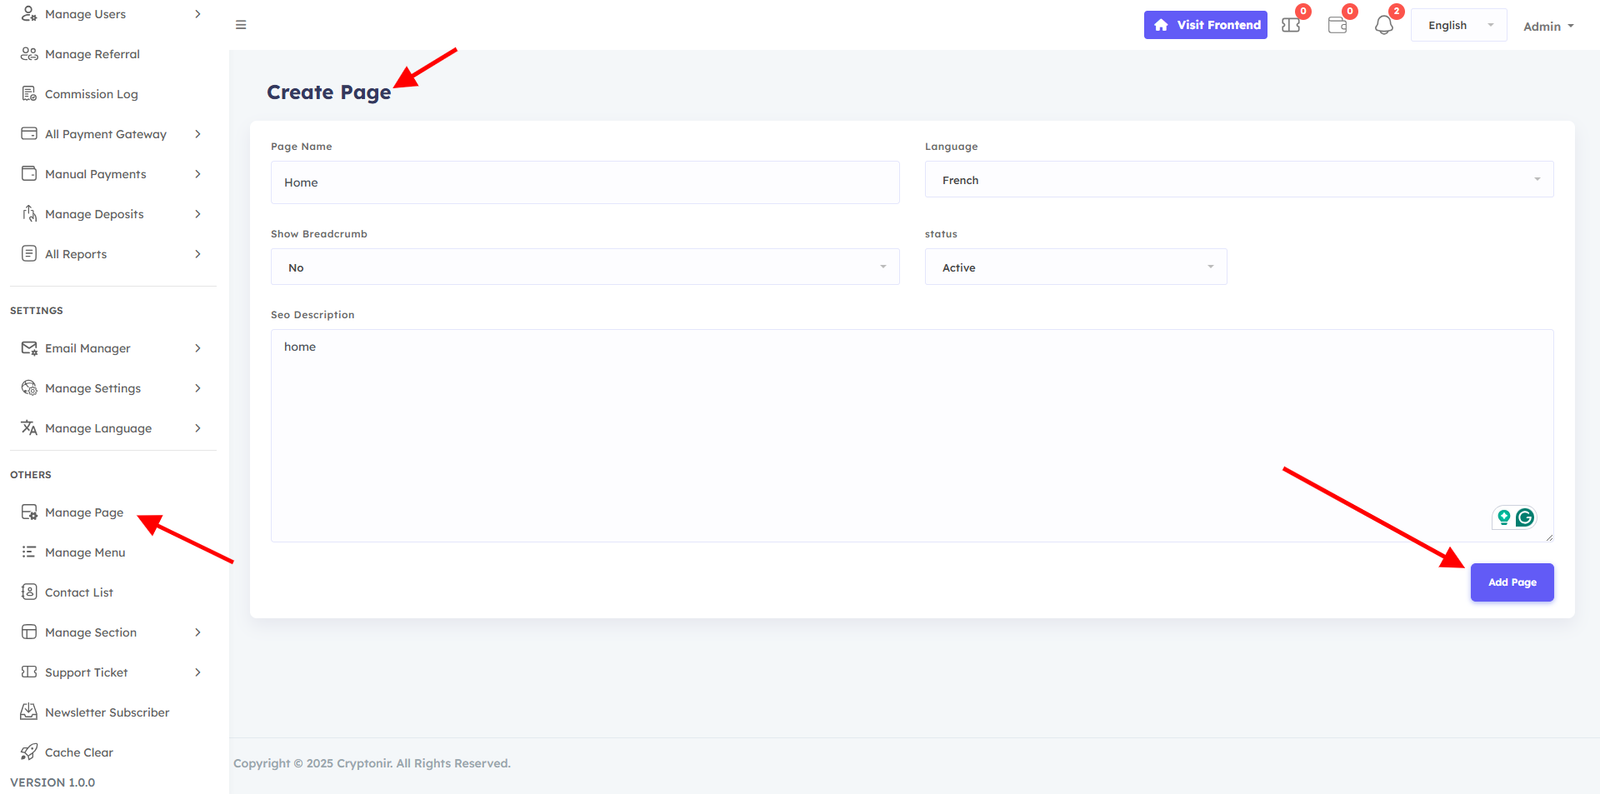
You go back to the Manage Page option and Set your page name. If you don't want the breadcrumb section, adjust the breadcrumb status accordingly. Select the language under which you want to create the new page. write an SEO description for the page and click the Add page button. Successfully, the page has been created under your language.
Step 3:
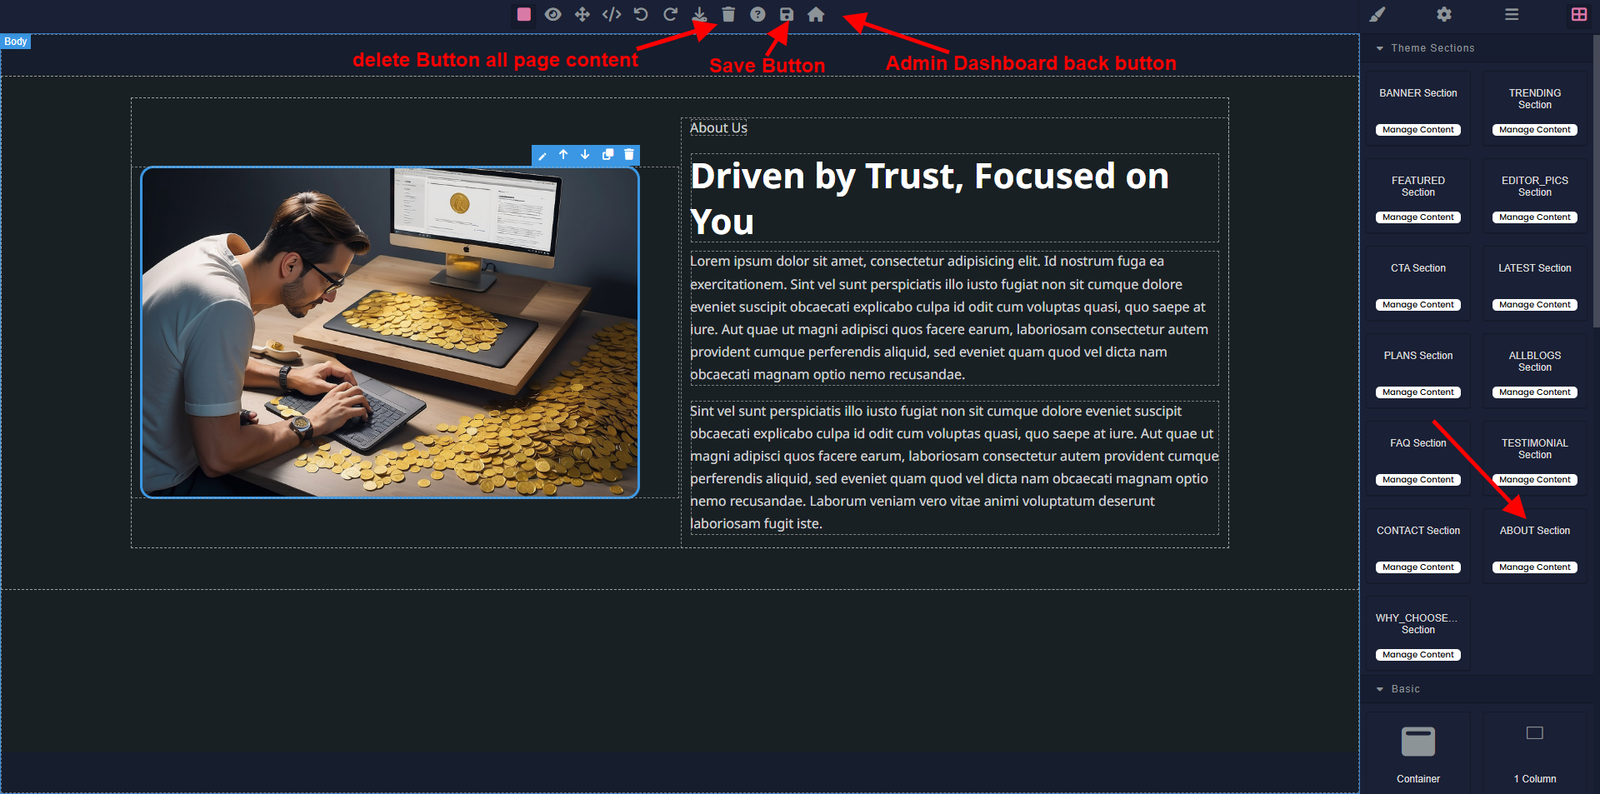
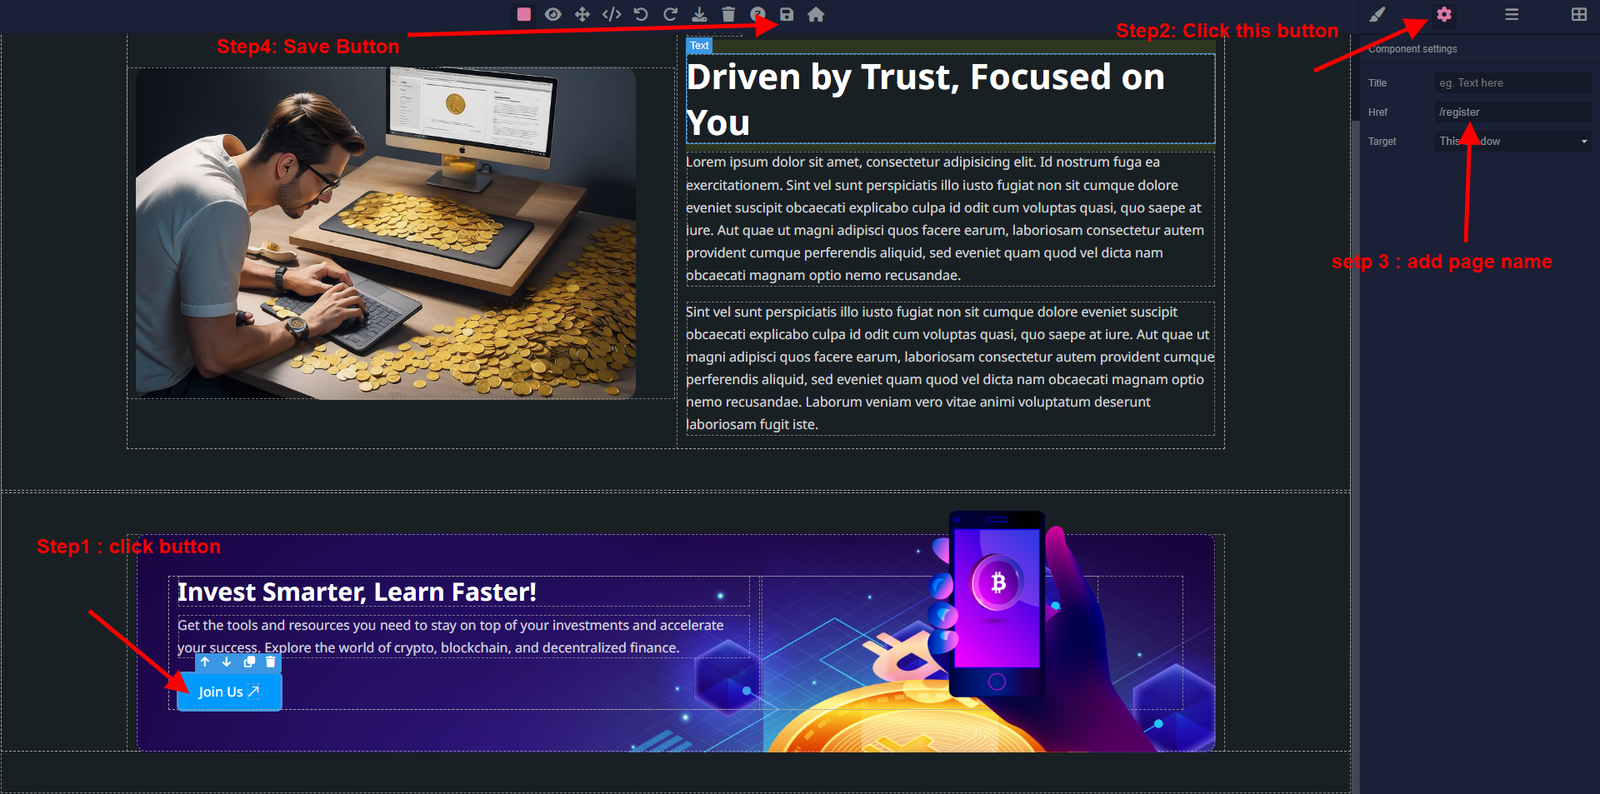
Go back to the Manage Pages option . select the language which under you created the new page. Then you will be able to view the page. Click on the content button and it will take you to a new page. On that page, arrange the page as you wish and click on the save button,

Step 4:
Click on the content button and it will take you to a new page. On that page, Customize the page as you wish and click on the save button, then click on the back button to return to the admin dashboard.
Type the content according to the language under which you created the page.You won't be able to edit content in some sections of the default design we've made for you, so you'll have to leave it as is.
How to translate content that you could not translate from this page ::
After successfully completing the language create page create and page customization and menu customization,Then you go to the website on your frontend and select the new language .you select and reload it. Then you come back to the admin dashboard and you will see a translate button your new language next you can Click on translate button it. Then you can view the English or default content of your website.
Then you will see all your default content there. You need to translate the content. You must translate specific content. You will get specific. Update your translation according to the language you created.
You could not translate some content in the page customize option.You can translate those contents from here. admin dashboard user dashboard can translate. Then your language will work.
Customize the page image update delete
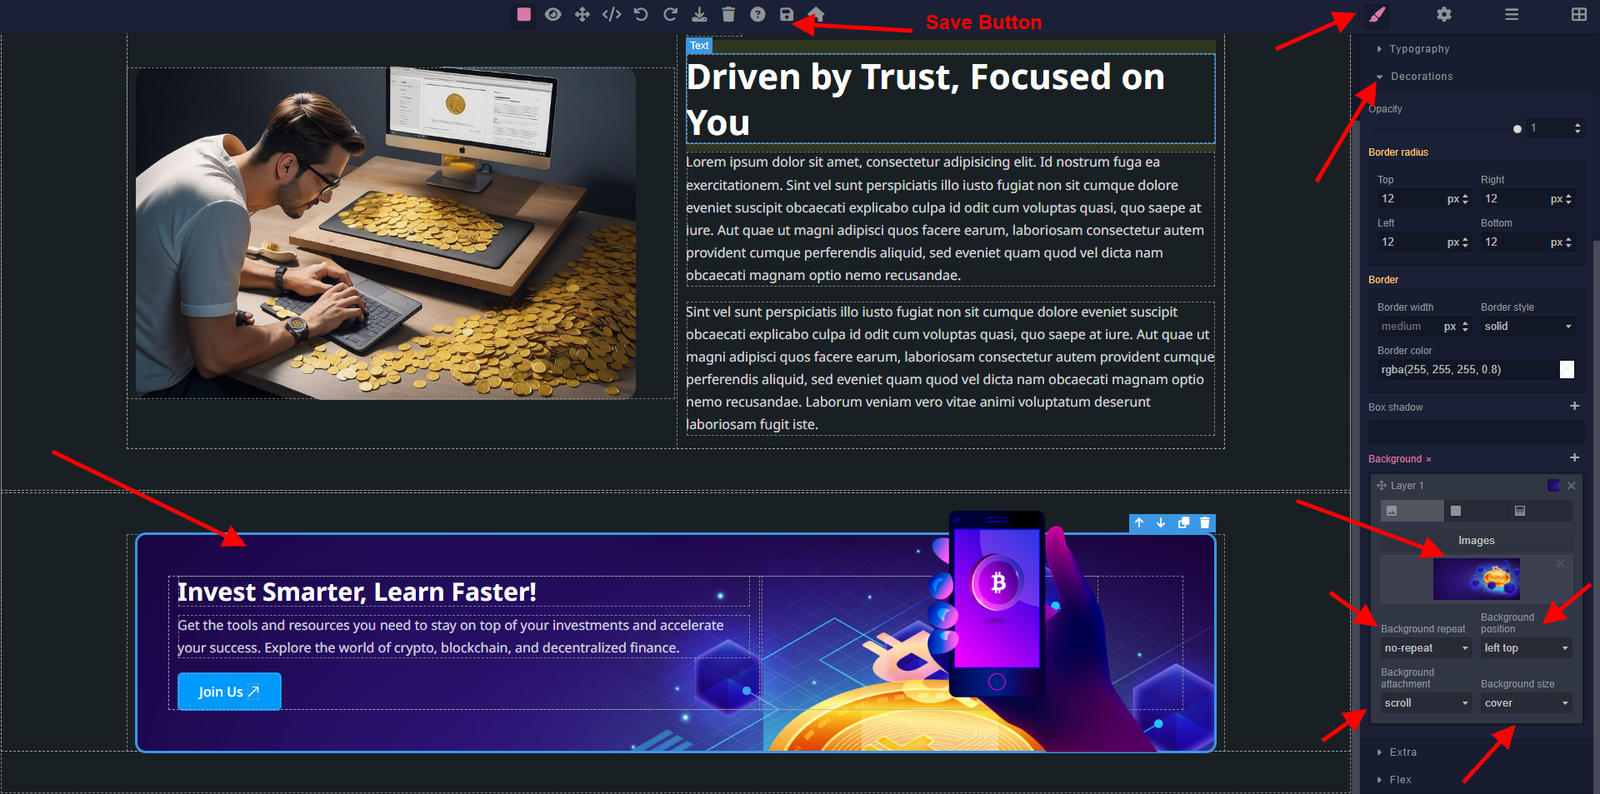
Customize the button link update delete
Step 5:
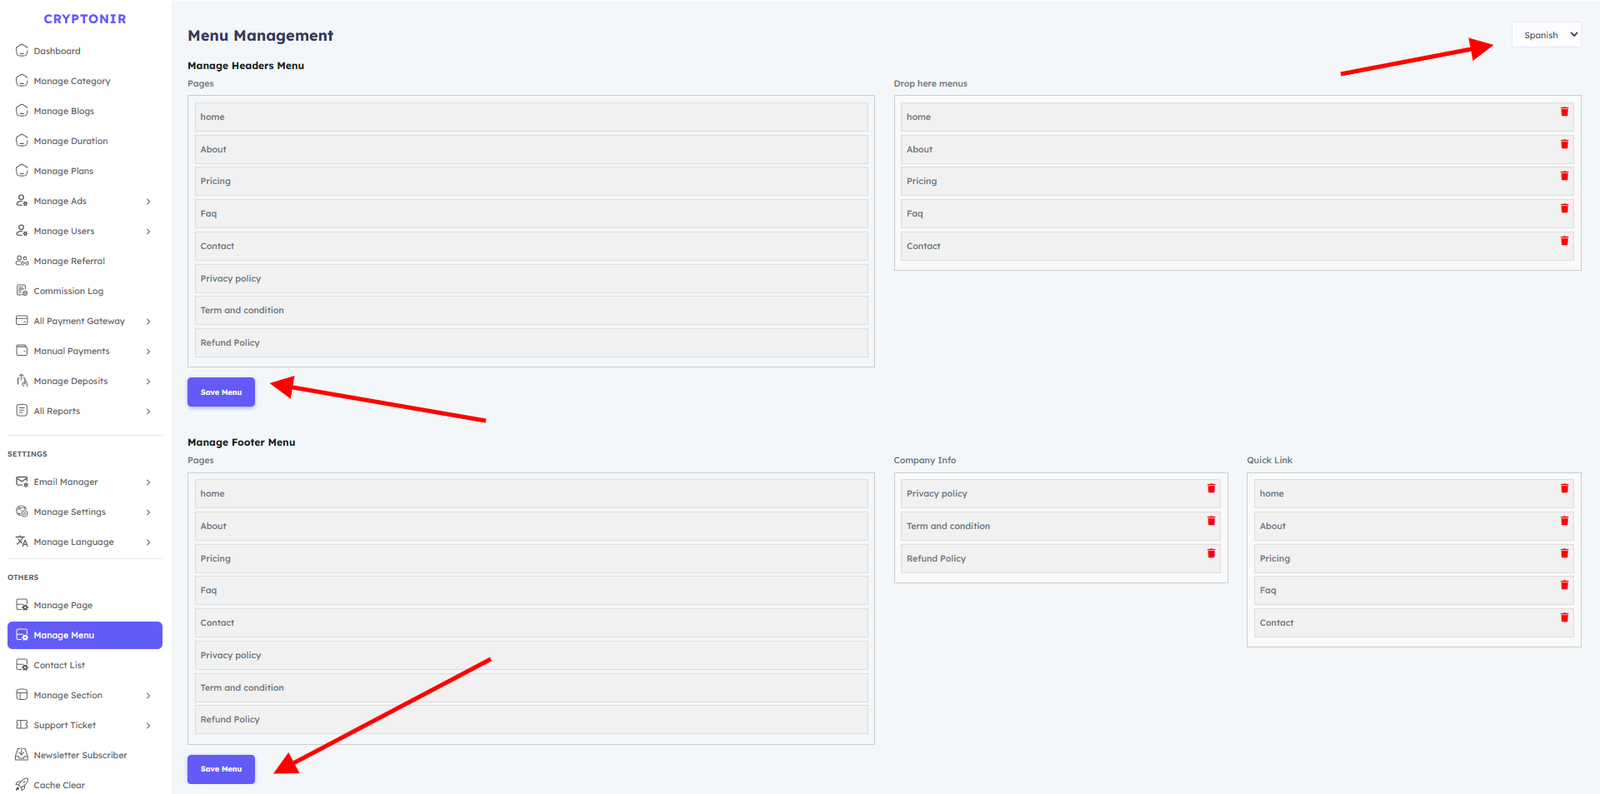
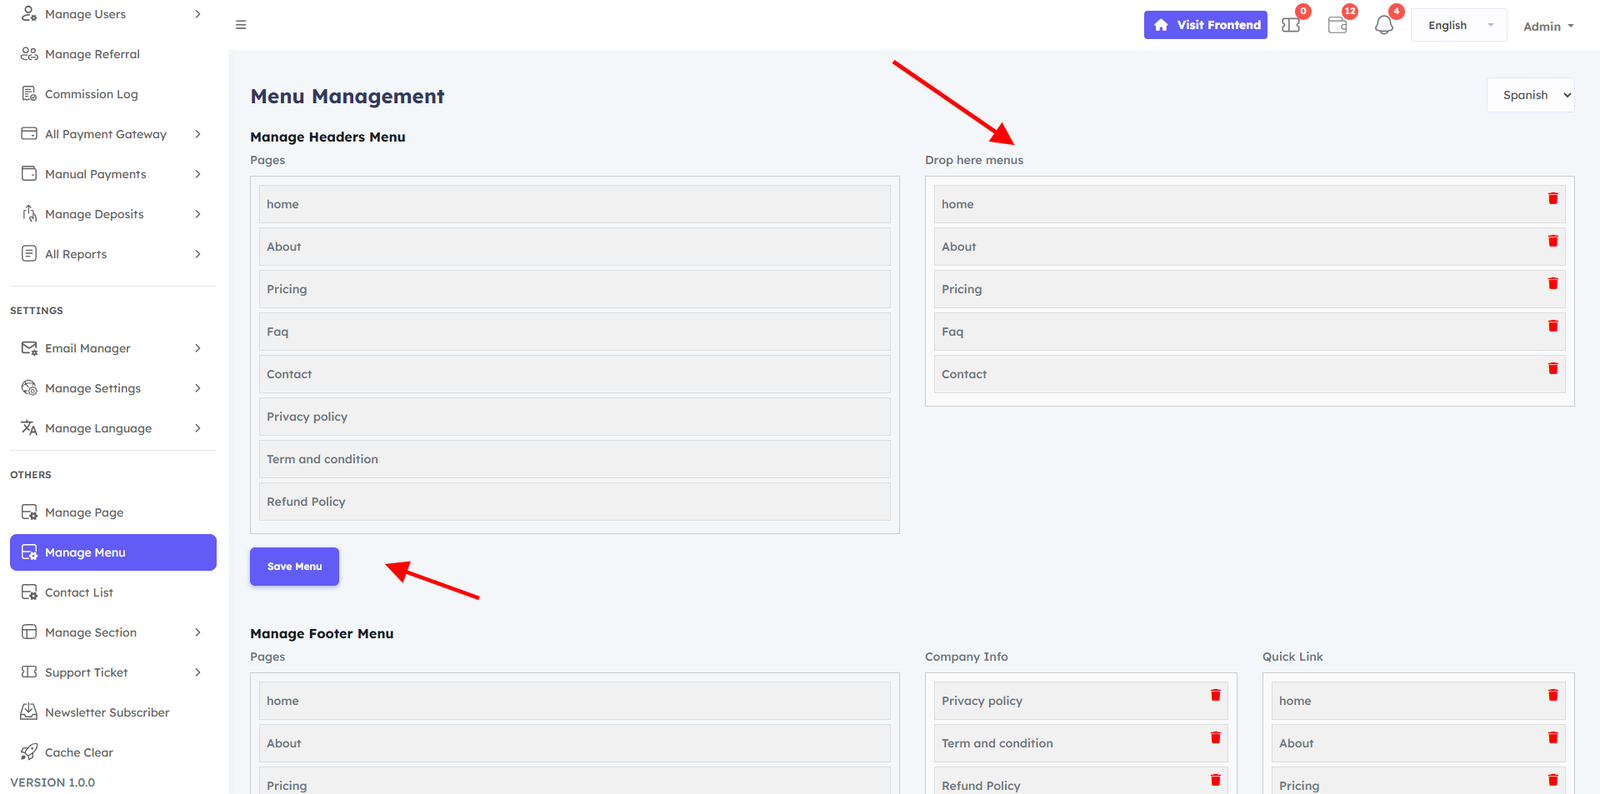
Go back to the Manage menu option . Select the language you want to organize the menu under.After selecting the language, you can view the pages under the language. You can easily drag and drop menu items from left to right to configure the header menus and Footer manu according to your preferences and click the save button.
You have successfully setup the language and page, now if you go to the frontend of the website and change the language, you will be able to see your website. The language is working properly.
Please watch in this video you can add or delete languages As you wish and if necessary
Manage page
Dynamic content management is provided by the Manage page in the Admin panel, which enables administrators to quickly update and change page content as necessary. By inserting section blocks, you can add different items, such as text, images, and videos, and alter layouts. This adaptability guarantees that your website stays interesting and dynamic, enabling you to react swiftly to modifications and efficiently convey information to your users. Additionally, you can improve your site's search engine presence while keeping it user-friendly by using SEO-friendly URL prefixes.
Customize the page video
Step 1:
Manage Page option and Set your page name. If you don't want the breadcrumb section, adjust the breadcrumb status accordingly. Select the language under which you want to create the new page. write an SEO description for the page and click the Add page button. Successfully, the page has been created under your language.
Step 3:
Go back to the Manage Pages option . select the language which under you created the new page. Then you will be able to view the page. Click on the content button and it will take you to a new page. On that page, arrange the page as you wish and click on the save button,
Step 4:
Click on the content button and it will take you to a new page. On that page, Customize the page as you wish and click on the save button, then click on the back button to return to the admin dashboard.
Customize the page image update delete
Customize the button link update delete
Step 5:
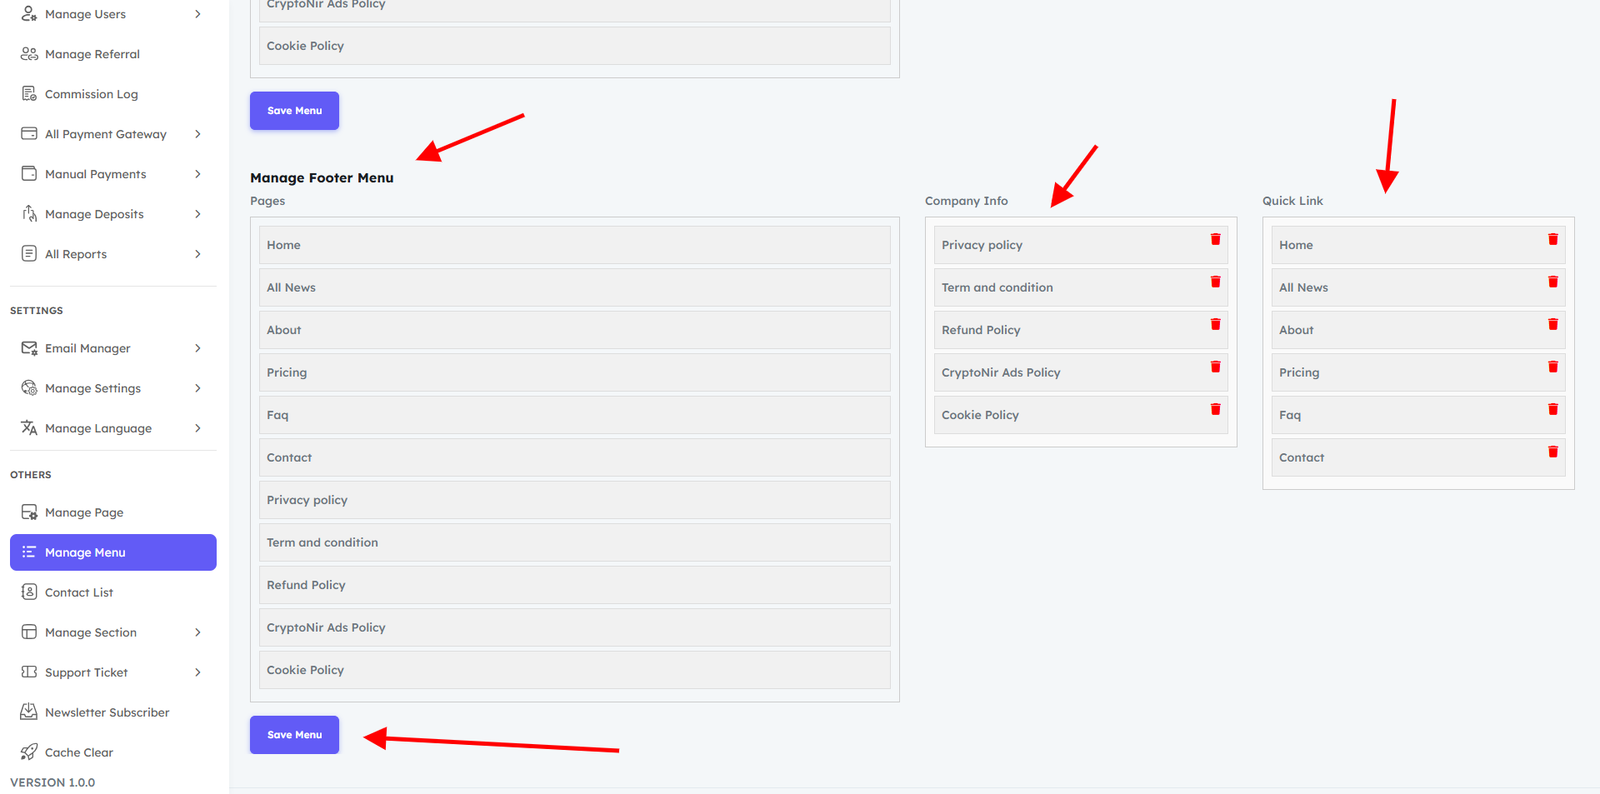
Go back to the Manage menu option . Select the language you want to organize the menu under.After selecting the language, you can view the pages under the language. You can easily drag and drop menu items from left to right to configure the header menus and Footer manu according to your preferences and click the save button.
You have successfully setup the language and page, now if you go to the frontend of the website and change the language, you will be able to see your website. The language is working properly.
Manage menu
The admin can easily inspect and arrange the generated menu list using the Manage Menu tool in the Admin panel. To customize the header or footer menus to your liking, simply drag and drop menu items from left to right. Because of this versatility, you may make unique menus and include external connections to improve the front-end navigation and user experience. The structure of your website will be customized to your needs thanks to this user-friendly management system, which also makes it simpler for visitors to locate pertinent content. .
You can easily drag and drop menu items from left to right to configure the header menus according to your preferences and click the save button.
You can easily drag and drop menu items from left to right to configure the footer menus according to your preferences and click the save button.
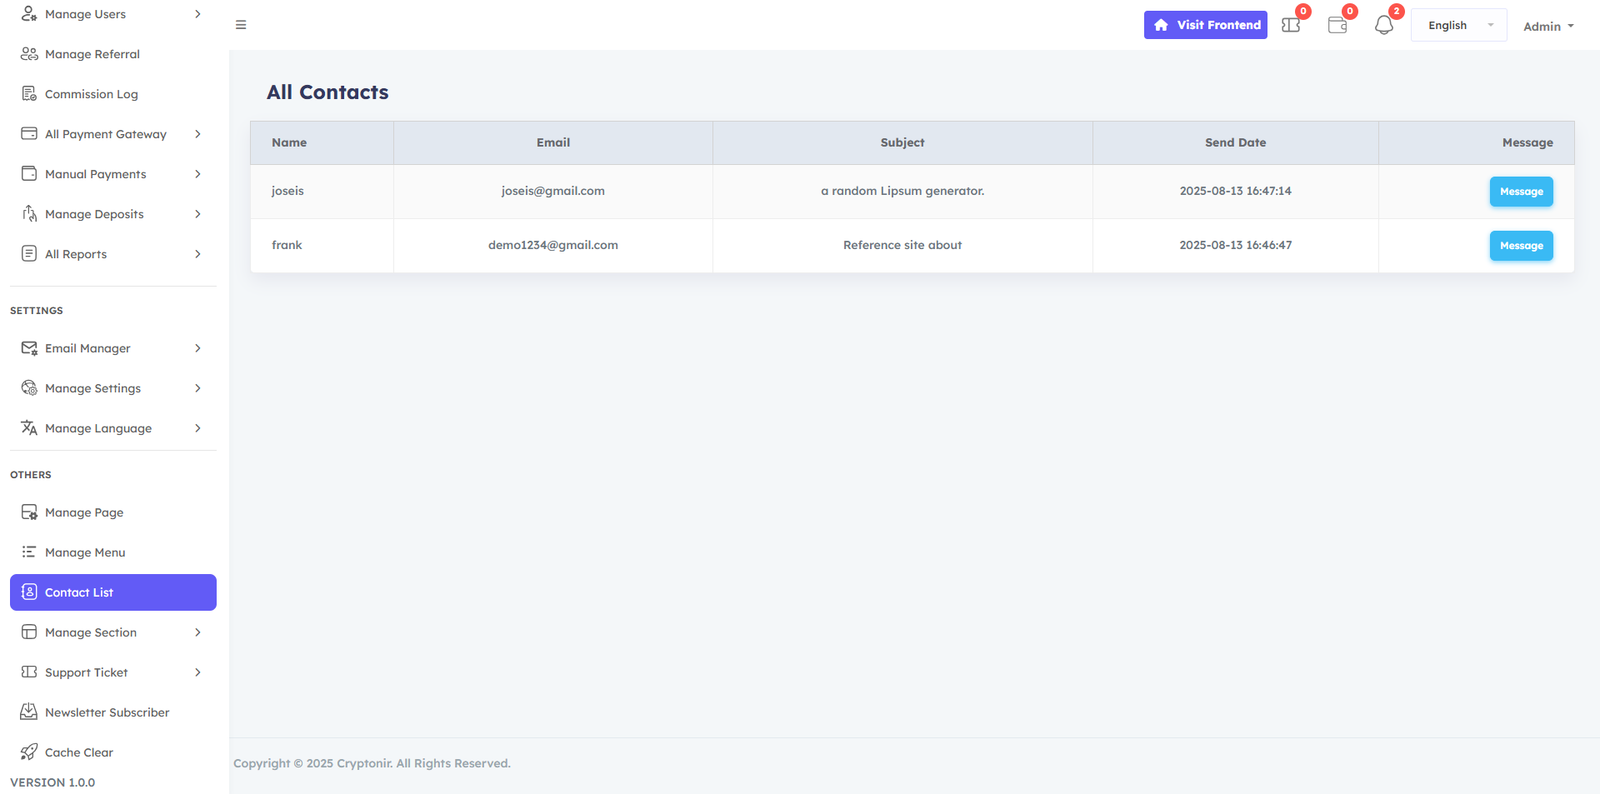
Contact List
The Contact List feature in the Admin panel allows admin viwe user send all contact information .
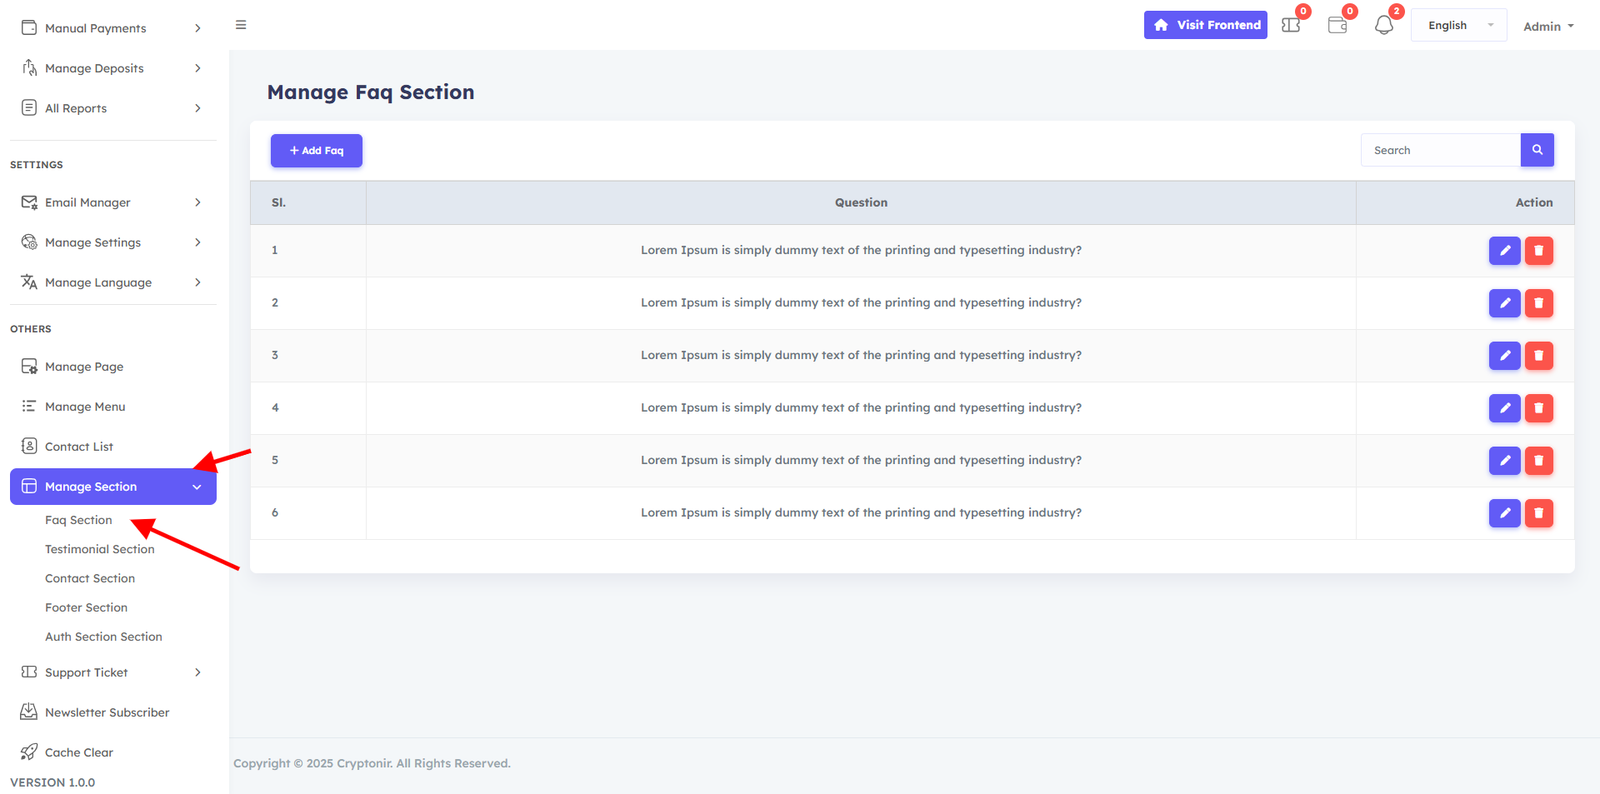
Manage section
The Manage section feature in the Admin panel allows admin to write and customize content for section on the pages . You can customize the contents of the non editable area from here as you wish. You can easily making it simple to tailor each section to your needs.
Support Ticket
This is very important , a user can take support from this ticket system and admin can easily answer in the reply section. morover you can also attach the media files too.

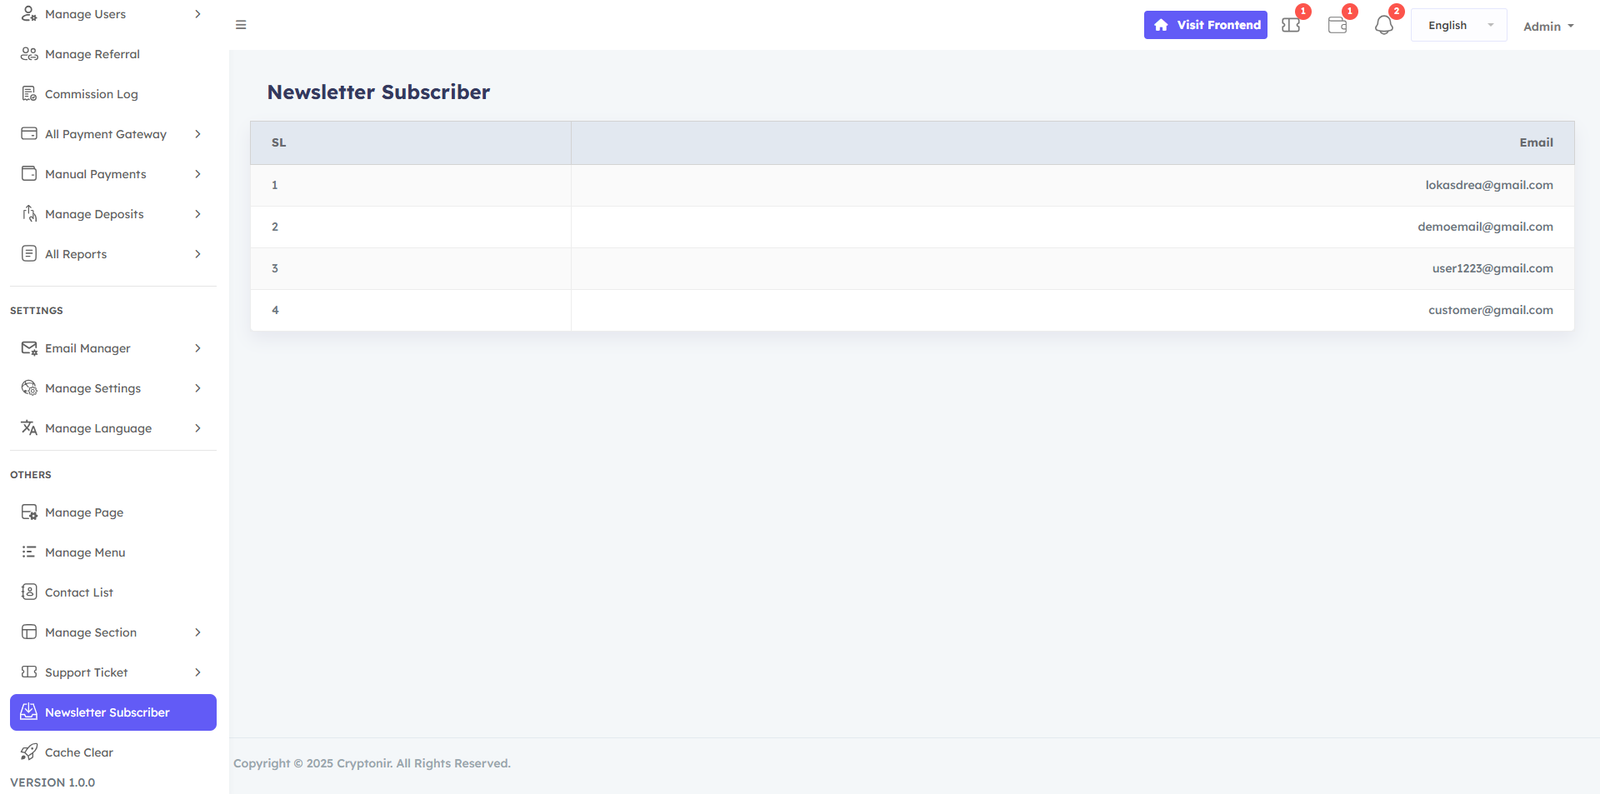
Newsletter Subscriber
Here you can manage Newsletter Subscriber and list all emails here
Softnir Support
We can only provide free installation support on cPanel powered web hosting. If you are unable to install, please contact us . support email: info@softnir.com